This is such a simple idea and super duper addictive. Once I started making these trees, I just did not want to stop!
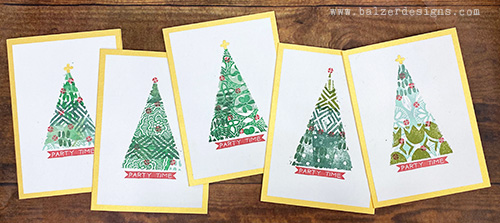
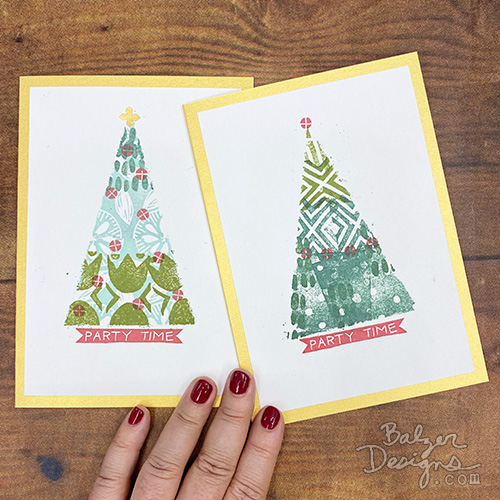
These stamped Christmas tree cards are made by masking off a simple triangle and filling it with layers of hand carved stamps and green ink. The technique is easy, loose, and perfect for making a whole batch of cards that coordinate without being exactly the same.
How to Make Stamped Christmas Tree Cards
Use washi tape or painter’s tape to mask a simple triangle on cardstock. Fill the triangle with overlapping stamped impressions in several shades of green, then remove the tape and add ornaments, a sentiment, or a star. The layered stamping creates a tree that feels graphic from a distance and wonderfully detailed up close. In essentials, I just stamped a whole bunch of hand carved stamps on top of each other!
Watch the video for the step-by-step stamping tutorial:
Supplies for Stamped Christmas Tree Cards:
- white cardstock
- tissue tape
- stamping ink
- hand carved stamps or any small pattern stamps
- craft foam
- scrap paper for masking
- tape runner
- paper trimmer
- gold cardstock
- optional: paper punch and wet adhesive
Layered Stamping Tips for Artists
Here are some ideas from the video that you might find useful in your art practice:
- Masking can create structure without drawing it. A few strips of tape are enough to define a simple shape and give your stamping a clear boundary.
- Different masking materials create different effects. Thin washi or tissue tape may allow some ink to seep through, while painter’s tape gives a cleaner edge. Neither is inherently better; it depends on the look you want.
- Imperfections can add character. Small dots, splatters, and irregular edges can make a piece feel more handmade rather than less successful.
- You don’t need to measure everything. Eyeballing a simple shape can keep the process loose and lively.
- Use scrap paper as an extra mask. When a stamp is wider than the taped area, a piece of scrap paper can protect the background and help you stamp cleanly right up to the edge.
- Mixing stamps creates visual richness. A small collection of simple stamps can feel much more varied when you combine different shapes, sizes, and patterns.
- Mixing ink colors adds depth. Several greens make the tree feel more layered and interesting than a single flat color.
- Layer stamps on top of one another. Overlapping impressions can create texture and complexity without adding new materials.
- Think about the shape of the stamp at the edges. Open, delicate stamps may create a less defined boundary, while bold stamps can help reinforce a crisp silhouette.
- You don’t always need to clean stamps between colors. Stamping off excess ink and allowing a little color mixing can create subtle variation and save time.
- Remove the mask before adding details that should break the boundary. Ornaments extending beyond the triangle make the tree feel more playful and less rigid.
- Simple tools can become custom art tools. A pencil eraser makes a perfectly useful tiny circle stamp.
- Use what you have in unexpected ways. A flower punch can become a star, a scrap of cardstock can become an embellishment, and leftover paper can become part of the card base.
- Small finishing details can change the personality of the piece. A stamped topper, punched star, sentiment, or contrasting border can push the design in different directions.
- A limited set of materials can produce lots of variation. A handful of stamps and a few ink pads are enough to make a whole batch of related but non-identical cards.
- Variation within a series is a strength. Changing stamp placement, ink color, layering, and details keeps repeated designs from feeling mechanical.
- The handmade look comes from accumulated choices. Loose masking, layered stamping, slight imperfections, and unexpected overlaps all contribute to a more personal result.
In Closing
I think the big art lesson here is that masking lets you turn a collection of unrelated stamps into a recognizable shape. In this case, the tape creates the outer edges of the Christmas tree while the layered impressions provide all of the interior pattern and texture. Try the same idea with circles, houses, hearts, ornaments, or other simple silhouettes.
I hope you enjoyed this tutorial. If you’re interested in learning more about carving and printing your own stamps, I offer several online classes.
Check out the rest of the tutorials in this series:
- How to Make Collage Cards from Gelatin Print Paper Scraps
- Stamped Christmas Tree Cards with Hand Carved Stamps (this post)
- Gelatin Printed Snowflake Cards: An Easy Holiday Card Tutorial
- Simple Mixed Media Tutorial Using Existing Supplies
- Masked and Stenciled Cards: An Easy Layered Stencil Technique
Thanks for stopping by!

Wonderful to wake up to this lovely holiday card inspiration today! Thank you Julie!
Great inspiration thank you. x
Cool cards.
Very cool Julie…..the process is easy peasy and can
Duplicated so easily for other occasions. Great techniques and helpful tips in the video are appreciated. T. Y.