Stenciling once is fine. But layering stencils and masks? Even better! These masked and stenciled cards combine hand-cut star masks with ink blending and a repeating stencil to create lots of color, pattern, and crisp layered shapes. It’s a simple technique, but there are so many ways you could adapt it for cards, art journal pages, collage papers, and more.
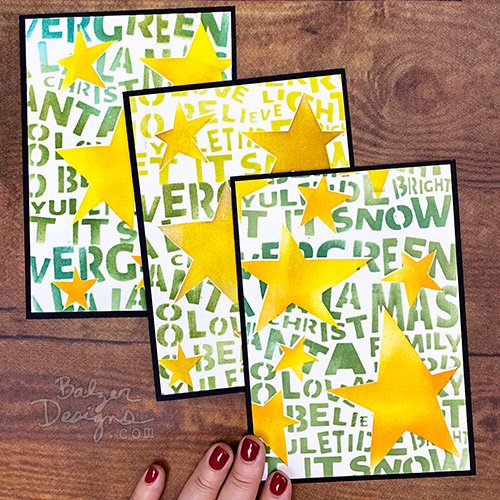
These cards feature a mixture of hand cut masks and stencil, along with a Crafter’s Workshop stencil I designed several years ago.
How to Make Masked and Stenciled Cards
Start by cutting several shapes from a temporary adhesive film. Use the negative space as a stencil to add your first layer of color, then replace the individual shapes as masks. Add a second stencil over the top and blend another color through it. When you remove the masks, the first layer is revealed underneath. Watch the video for the full how-to:
Supplies for Masked and Stenciled Cards
I’ve linked to the supplies that I use, but I always encourage you to use what you have on hand!
- white cardstock
- transfer tape
- Identi-Pen
- craft knife & cutting mat
- Distress Ink
- Ink Blending Tools
- scrap of paper for extra masking
- optional: release paper
- The stencil is called “Christmas Words.” Sadly, it’s discontinued, but you might like THIS or THIS.
- painter’s tape
- tape runner
- paper trimmer
- blank black card
Why Use Distress Ink for Stenciling?
Distress Ink stays workable long enough to make color blending relatively easy, which is useful when you want soft transitions between several colors. Most stamping inks are also transparent, so remember that earlier layers may show through later ones.
Layered Stenciling Tips for Artists
Here are a few takeaways from the video that might be useful to you:
- Plan for registration when working with masks. Numbering each shape, marking its orientation, and keeping a simple “map” makes it much easier to put everything back in the right place.
- Perfect cutting isn’t necessary. The hand-cut shapes don’t have to follow the drawn lines exactly. Slight irregularities can make the finished piece feel more lively and handmade.
- Rotate the material instead of your cutting hand. Keeping the knife moving in a comfortable, consistent direction while turning the paper or film gives you more control.
- Use temporary adhesive materials thoughtfully. You want enough stick to keep edges crisp, but not so much that the mask damages the paper when removed.
- A light touch creates softer blends. Pressure matters when applying ink. More pressure can create a harder edge, while a softer touch helps colors transition more gradually.
- Build color slowly. Repeated layers of ink increase the intensity, which means you can control value and saturation rather than committing to a dark color immediately.
- Protect areas you don’t want to ink. A scrap of paper can act as a quick additional mask when you’re working close to an edge.
- Color contamination can become part of the process. Reusing an inked stencil or mask may transfer traces of earlier colors. Clean it if purity matters—or embrace the unexpected mixing.
- Save release paper. The backing from stickers and adhesive products makes an excellent storage surface for reusable masks and stencils.
- Reuse your masks while they still work. Temporary masks can often be used many times before they lose their tack.
- Combine masking and stenciling for more complex imagery. The first layer establishes one set of shapes; masking those shapes before adding another stencil creates depth without requiring complicated techniques.
- Tiling lets a small stencil cover a large surface. Carefully repositioning and aligning a stencil allows a repeating pattern to continue across a larger sheet.
- Secure your stencil on two sides. Taping perpendicular edges helps prevent shifting while still allowing you to reposition the stencil when needed.
- Mistakes are often repairable. A torn spot or stray mark doesn’t necessarily ruin the piece. Returning with the stencil and matching color can disguise the problem.
- Make a larger sheet and crop later. Working big gives you several possible compositions to choose from and can produce multiple finished pieces from one session.
- Cropping creates variation. Two cards cut from the same sheet can feel different simply because different parts of the pattern are emphasized.
- A series doesn’t need to be identical. Related colors, shapes, and techniques can create cohesion while differences in placement and cropping keep each piece individual.
- Process systems free up creativity. A little organization—labels, arrows, storage surfaces, dedicated blending tools—reduces frustration and leaves more attention for color and composition.
In Closing
I hope you enjoyed this tutorial. Once you understand the basic masking-and-stenciling sequence, you can use it far beyond holiday cards. Try the same approach on art journal pages, collage papers, tags, artist books, or larger mixed media work. Change the shapes, colors, and stencil pattern and the technique becomes something completely different. If you’re planning on layering, just remember that Distress Ink is water reactive!
Check out the rest of the tutorials in this series:
- How to Make Collage Cards from Gelatin Print Paper Scraps
- Simple Mixed Media Tutorial Using Existing Supplies
- Gelatin Printed Snowflake Cards: An Easy Holiday Card Tutorial
- Masked and Stenciled Cards: An Easy Layered Stencil Technique (this post)
- Stamped Christmas Tree Cards with Hand Carved Stamps
Thanks for stopping by!


great idea and video.
Great video thank you x
Nice. Thank you! I have started playing with alcohol inks. People think its magical when they see it on “paper”. And trying stencils with it. Love your stencils by the way.
How fun and what a great use for the release paper. What is the difference between distress ink and regular in? I’m assuming that you did the stars first because the yellow isn’t totally opaque and the green stencil would bleed through?
I’m not sure there is regular ink anymore. All stamping inks have certain qualities. Distress Ink has a longer open time than most dye based inks, so its perfect for color blending. And yes, most inks are transparent.