An image transfer is a mixed media technique where you lift an image from one surface, such as a magazine page, and transfer it onto another surface such as paper, fabric, or wood. The result is often ghostly, imperfect, and textured. Here are a few examples of image transfers that I’ve done over the years:

How Image Transfers Work
At its core, an image transfer relies on separating the ink or toner of an image from its original carrier (usually paper) and re-adhering it to a new substrate. The process can be achieved through several methods, depending on the materials and effects you want. Let’s explore some common methods of image transfer.
Gel Medium Transfer
- How it works: Apply a thin, even coat of acrylic gel medium to your target surface. Place the image face down into the wet gel. Smooth out air bubbles, let it dry completely, then dampen the paper and gently rub it away to reveal the transferred image.
- Best for: Paper, canvas, wood panels.
- Pro tip: Laser prints and magazine images tend to work better than inkjet prints because the toner sits on the paper surface rather than soaking in.
You can see the photo at the bottom of the canvas. That is a gel medium transfer I did back in 2009:
You can find a short video tutorial on making a gel medium image transfer skin HERE.
Packing Tape Transfer
- How it works: Place a piece of clear packing tape over an image and burnish it firmly. Soak the taped image in water until the paper softens, then rub the paper away. You’ll be left with a transparent image on the tape.
- Best for: Collage layers, journaling, or adding transparent imagery to sketchbook pages.
- Pro tip: This method creates a semi-transparent, glossy finish that layers beautifully over text or painted backgrounds.
This is a small quilt I made using packing tape transfers back in 2010:
I put together a video tutorial on making a packing tape transfer that you can find HERE.
Gelatin Plate “Transfer”
- How it works: Roll acrylic paint onto a gelatin plate. Place a magazine image or laser print face down on the plate, burnish, and then peel it off. The toner resists the paint. Let that layer dry. Add new paint and pull your “transfer!”
- Note: “Transfer” is in quotes because this is not a true transfer. It’s more of a resist.
- Best for: Monoprinting, collage, and art journaling.
- Pro tip: Use high-contrast black-and-white images for the clearest results because only the black ink “transfers.”
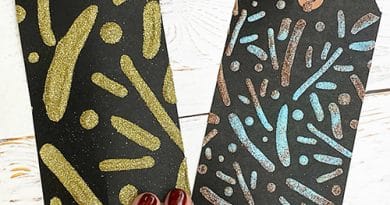
Here are some layered magazine image transfers I did on the gelatin plate this week:
I posted a full how-to video tutorial in the My Art Practice classroom. You can also see my blog post about basic magazine transfers on the gelatin plate HERE.
Solvent or Blender Pen Transfer
- How it works: Place a toner-based photocopy face down on your surface. Use a blender pen or a solvent like xylene or acetone to dissolve the toner and press it into the new surface.
- Best for: Quick transfers on paper or fabric.
- Pro tip: Always use solvents in a well-ventilated area.
Here is a blending pen transfer from 2014:
You can find a link to a tutorial on how to use a Xylene Pen to transfer HERE.
Choosing the Right Image
High-contrast black-and-white images transfer the best. Text, faces, and bold graphics all yield striking results. Remember that the image will appear reversed (except for gelatin plate image transfers), so mirror text before printing if you want it to read correctly.
Also, when working with image transfers, it’s important to think about where your images come from. Using your own photos, drawings, or scans ensures your work is entirely original. If you use found images—like magazine pages, vintage photos, or internet prints—be mindful of copyright and ownership. In general, it’s fine for personal art journals or experimental pieces, but if you plan to sell or publicly exhibit the work, choose copyright-free, public domain, or Creative Commons images to stay on the right side of fair use. You can find books of copyright free images to use HERE.
Creative Uses for Finished Image Transfers
- Layer image transfers over acrylic paint for visual complexity.
- Combine transfers with drawing.
- Transfer onto unusual surfaces (wood, fabric, metal, acrylic, clay).
- Use transfers as collage elements.
- Create multi-layer prints.
- Make transparent art journal pages.
- Integrate text and typography.
- Create mixed-media portraits using transfers.
- Use transfers to create stationery.
- You can even use transfers in sculptural or dimensional work.
- Combine image transfers with printmaking or stencils
Final Thoughts
Image transfers embrace imperfection. Each method creates unique textures and artifacts that can’t be duplicated digitally. They’re a bridge between photography, printmaking, and painting. Image transfers are perfect for artists who love process and surprise and a bit of grunge!
Let me know your favorite image transfer technique!
Thanks for stopping by!