

Welcome to Day Three of Art Supply Organization Week! Links to all of the “Organization Week” posts are available by clicking HERE.
Today we’re going to talk about storage containers. If you’re an organizing geek like me, a trip to The Container Store is as good as one to Disneyland!
The Wrong Storage Containers for Your Art Supplies
It’s pretty obvious why storage containers are important, right? What’s less obvious is that using the wrong storage containers can be disastrous! I’ll give you an example:
You’re all excited about being organized! So you head out and buy all these big beautiful storage boxes. Maybe some of those big deep plastic bins with a lid? Very sensible choice. And then you head home and put your entire fabric collection into that bin (like-with-like). You carefully label the outside and admire how beautifully neat and clean it looks all closed up in there. Repeat with several other supplies and stack.
Fast forward a few days and you need a piece of fabric.
Well, first you need to lift the other boxes off of the fabric box. Oy. Then you need to open the fabric box. Now you need to root around inside the box to find the fabric you’re looking for. Keep going. Boy, that container sure is deep! Ah, found it! So put back all of the fabric you went rooting through. Put the lid back on. Now restack those other boxes. Phew. Only took you fifteen minutes to find the piece of fabric you wanted…oh, wait! You wanted the one with blue stars…!
Doesn’t sound fun, does it? So what’s the trick to finding the right containers?
Art Supply Storage = Easy to See. Easy to Put Away
Here’s a quick rule of thumb: Your art supplies should be easy to see and easy to put away.
Easy to See:
- Open Storage
- Clear Containers
- Labeled Containers
- Drawers, esp. shallow drawers
- Open shelving
Easy to Put Away:
- Try not to stack boxes on top of each other
- Open Storage
- Drawers
- Labeled Containers – so you know where everything goes
- Grouped like-with-like
And remember, pretty storage containers are a wonderful bonus, but don’t make them your focus. Functionality is King in an organized studio. And it doesn’t have to cost an arm and a leg.
Let’s talk about low cost storage containers — free, repurposed, and thrifted.
Cheap Art Supply Storage Solutions: Boxes
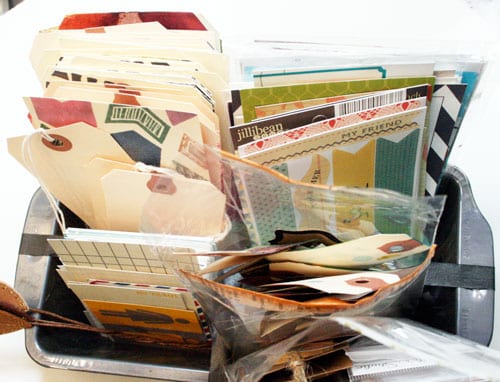
Way back in January 2010 I wrote a post about my favorite kind of storage: USPS boxes turned into storage containers.
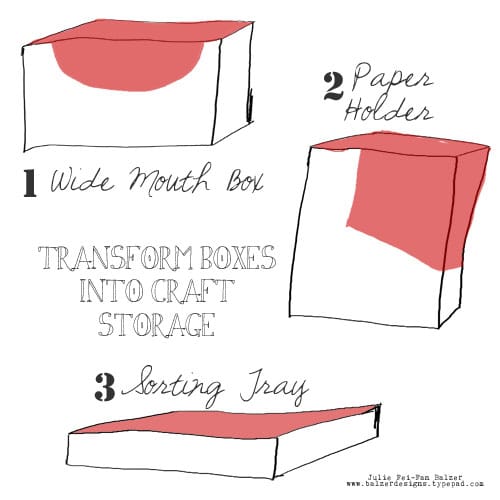
The red part is the section of the box I cut away. I am a utilitarian and leave the boxes “as is…”
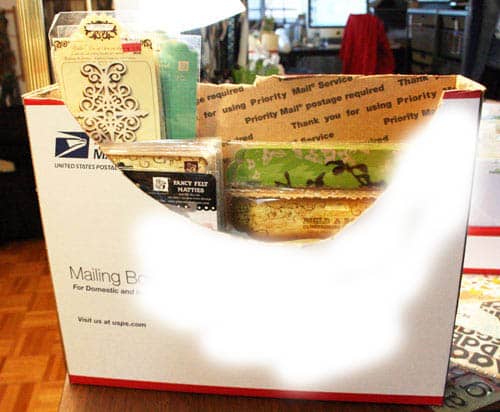
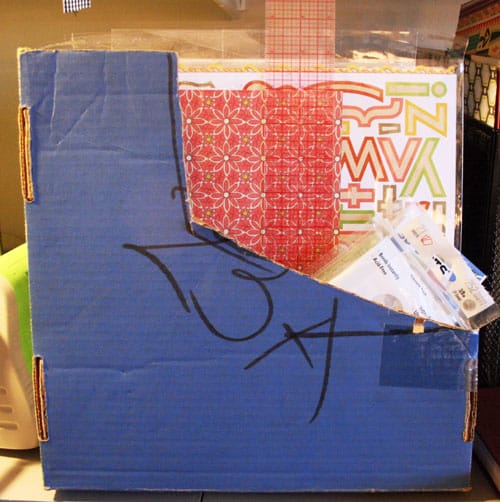
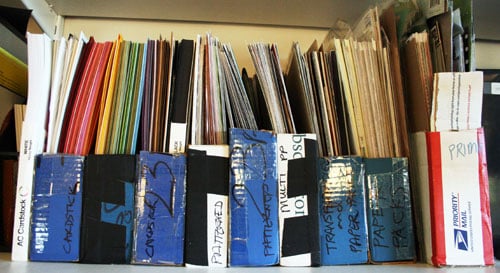
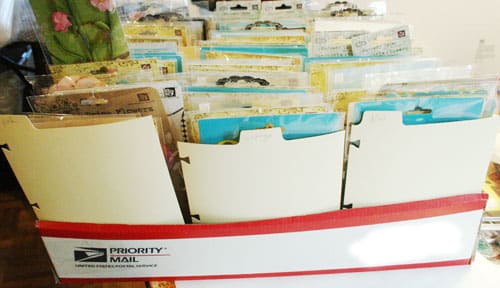
…but you could certainly paint them or cover them with pretty paper. These open boxes (in any of the three styles) are such functional storage. With my paper collection above I can see what I have, poke through it as needed, bring it to my desk, and easily return unused paper to storage. Part of the reason that this system works is that my boxes are not overstuffed. I do a paper purge every 3-4 months and get rid of cardstock and patterned paper that doesn’t suit me right now.
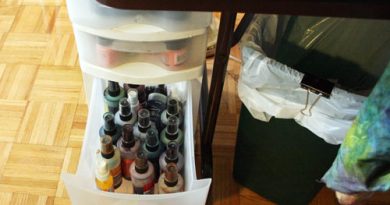
Cheap Art Supply Storage Solutions: Buckets, Cups, Cans
Another of my very favorite containers are $1 buckets from Michaels. I simply painted them up to be a bit more “Julie.” (Read the full post here.) And now they sit on my desk holding my most used tools and my most used pens:
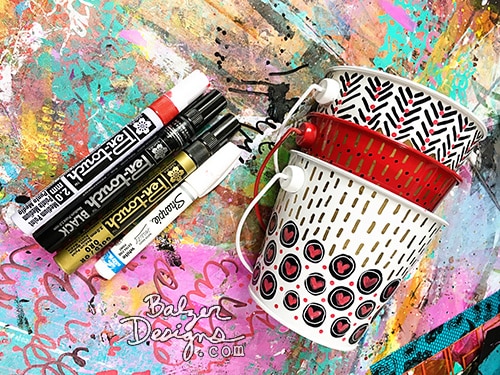
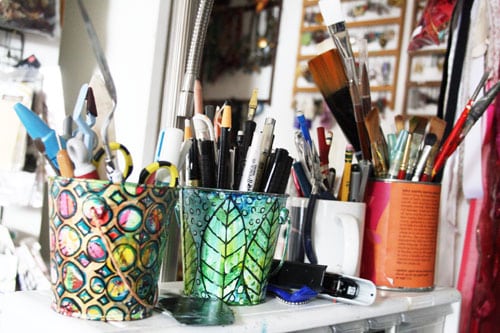
You can see from the second photo that I also repurposed a mug and a prettily labeled tin can for storage. This is easy open storage. I can grab one of the containers and bring it down to my work desk or simply toss my tools back into the bucket when I’m done with them.
Cheap Art Supply Storage Solutions: Bakeware
A recent favorite storage item is this loaf pan pilfered from the kitchen.
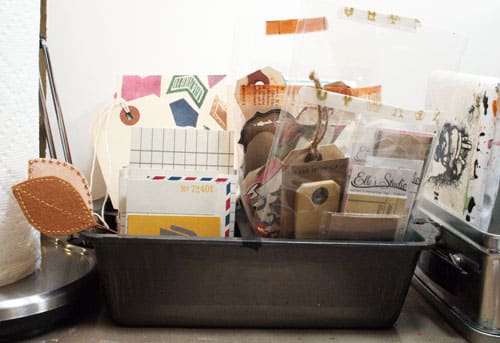
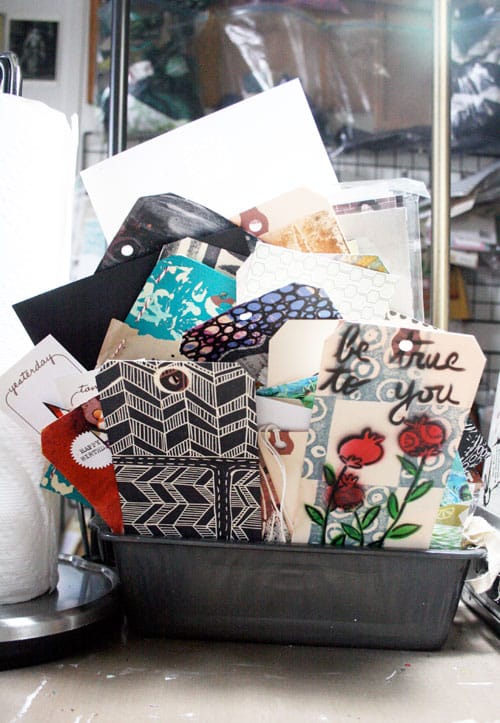
Once again, it is open storage that I can drop things into and pull stuff out of without having to move think about it. You can find all kind of inexpensive bakeware — loaf pans, muffin tins, glass dishes, etc. — at your local thrift store or a yard sale! (And sometimes even in the garbage.)
And now, here are three other great ideas for repurposed or inexpensive storage containers!
Desk Drawer Divider Trays
Leslie Sowden shares her tips on using desk drawer divider trays.
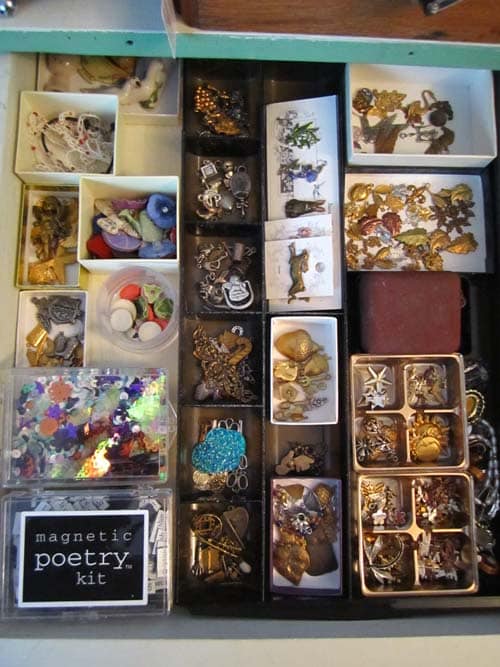
My storage container for small items is a desk drawer divider tray. You can sometimes get them at the dollar store, and the big discount stores often have a variety of types to choose from. I also always save every small box I come across – jewelry gift boxes, the plastic trays from a box of chocolates, even cardboard or styrofoam egg crates with the top cut off would work.
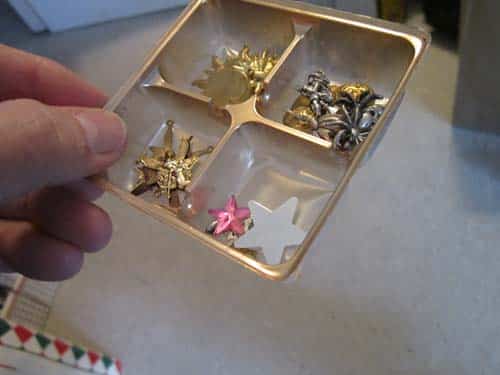
With the variety of sizes, I make a jigsaw puzzle from them, fitting them into the drawer or box that I want to store my goodies in.
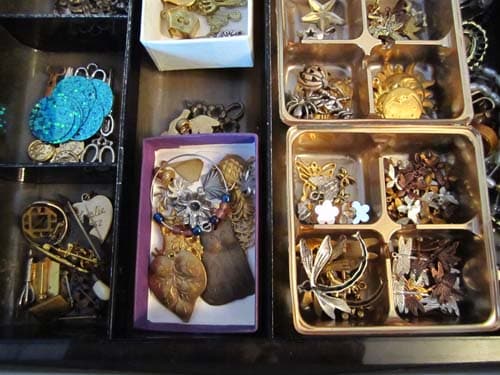
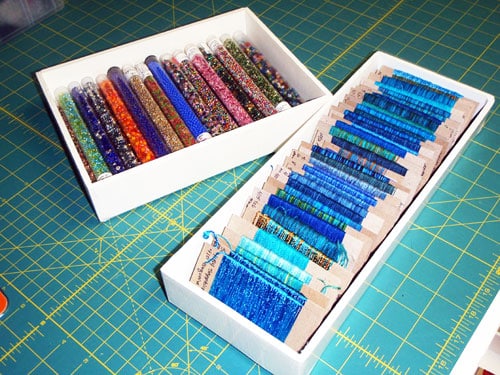
During the years I crazy quilted, I collected tons of buttons, charms, beads – all kinds of small items that I wanted to keep sorted and be able to find easily. Dumping everything in a jar may look pretty on the shelf, but it’s terribly inefficient when you’re actually trying to find something.
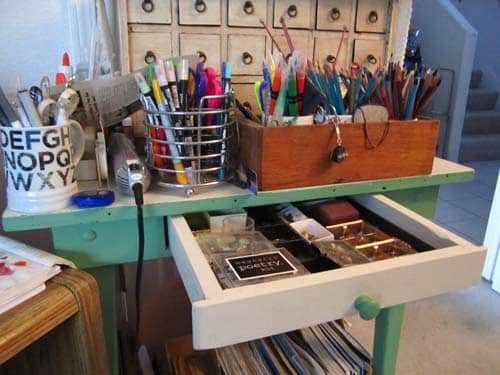
This system works because the tray and boxes are shallow, so everything is visible.
You can layer the trays, depending on the depth of your drawer, but they’re still easy to lift out and be able to see everything at a glance.

My drawer currently has only the one tray in it, plus an assortment of jewelry boxes, candy box dividers, and other small containers, but I’ve had them many layers deep in other furniture and it’s a system I’m always happy with.
Q: How has this storage system changed your art work and/or creative process?
A: It has eliminated the frustration of knowing I had something that I wanted to use, but being unable to find it. That’s huge for me because I get frustrated easily by that sort of thing.
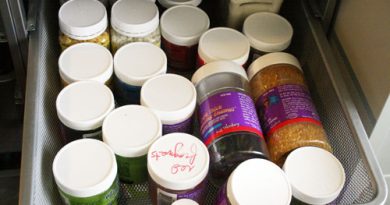
Lazy Susan for Art Supplies
Pam Fairchild shares her crafty Lazy Susan.
I tried to look up the definition of a Lazy Susan but got sidetracked by all the available kinds and sizes when you Google it. I did notice one of the suggestions at the bottom was a Motorized Lazy Susan, I guess that’s for the very lazy person! LOL
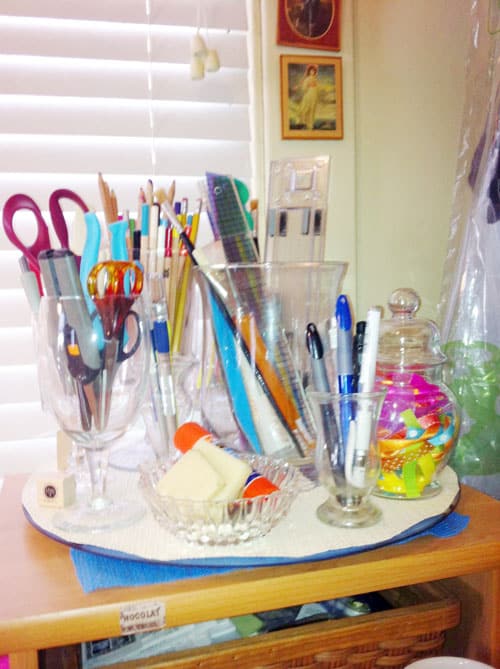
This above all else is my favorite “tool” on my work table. I got the idea for it from seeing another crafter’s version but she had used a smaller one with tin cans she had covered in paper.
This is a glass Lazy Susan I had originally purchased to use on our dining room table. Needless to say that lasted about one meal with 2 pre-teen boys in the house. The top is tempered glass and it is 15” in diameter. On top of it I cut standard rubber shelf liner I purchased from the dollar store — don’t want those glass containers flying off when I spin it!
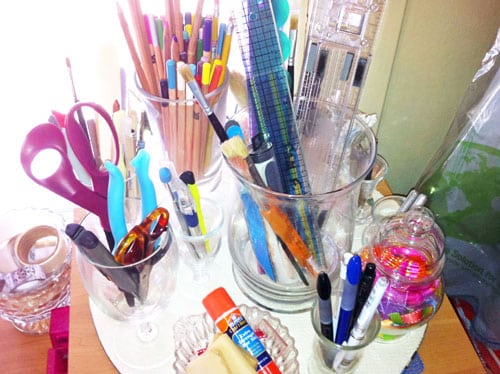
I love that all the containers are clear so I can see exactly what I have!
DIY: Make Your Own Custom Boxes
Lorri Flint shares some homemade boxes.
This past year, my business partner and I both got map drawers.
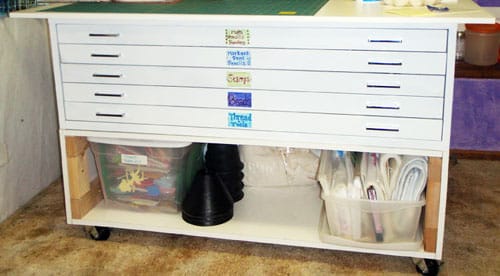
While I was thrilled with the storage opportunities, I didn’t know how I would find inexpensive, shallow storage boxes in a variety of sizes to organize all my art supplies. So I decided to make them!
I had a bunch of 1/4″ foamcore board and with a little trial and error, I designed a nifty box that I make in custom sizes to fit my supplies AND fit any drawer height and width. The cuts to create the sides of the box don’t go all the way through, I just fold up the sides and use white duct tape for the corners. The resulting box is quite sturdy, simple to make, customized and inexpensive (visit Lorri’s blog for a tutorial on how to make the boxes).
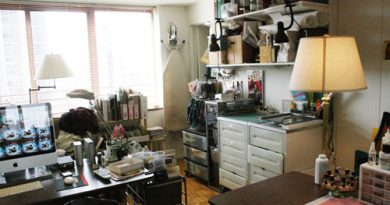
I’m making more art now that my supplies are organized and accessible!
For me, being organized enables me to make more art and actually enjoy being in my studio!
Your Assignment
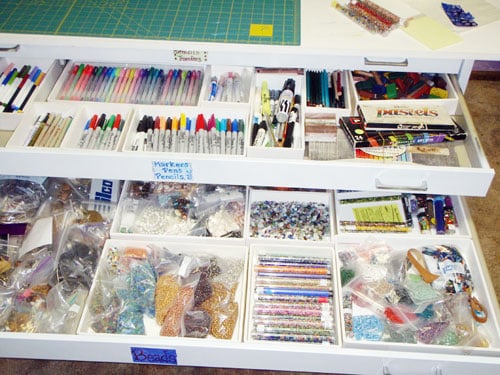
You may have noticed that Leslie, Pam, and Lorri’s solutions are all about making your supplies visible. I love what Leslie wrote: “Dumping everything in a jar may look pretty on the shelf, but it’s terribly inefficient when you’re actually trying to find something.” The question is how do you corral those little things? Leslie uses divided containers and Lorri has made her own little containers. I keep mine in tiny labeled drawers:

These are from the hardware section. Meant for screws and bolts, I’m sure.
And that leads us into today’s assignment. It’s an easy one today: find as many storage containers as you can. Look all over your home, figure out what you have that you could turn into storage. Here are some places to look:
- The kitchen. One of the most functional rooms in your home.
- baking pans
- dish racks
- jars
- vases
- tupperware
- Lazy Susan
- glasses and cups
- lunch boxes
- candy boxes
- tin cans
- The garage.
- tiny drawers
- bins and buckets
- peg board
- tackle boxes or tool boxes
- The basement.
- boxes
- baskets
- old furniture like dressers, bookshelves, tables, or desks
- The bathroom.
- repurpose empty tissue boxes
- paper cups
- toilet paper tubes (stick a bunch of them, on end, in a shoebox and you’ve got pen storage)
- bandaid tins
And I’m sure you can think of many more! In fact, if you’ve blogged about any repurposed storage, please leave us a link to your blog post in the comments section!
Thanks for stopping by!
About The Contributors: Leslie Sowden

I turn 60 in January of 2012 and have been doing something or other crafty pretty much my entire life. My mom was a good painter, oils and acrylics, doing a lot of consignment work as I was growing up. I did not inherit even a smidgen of the painting gene, however, so I moved on to quilting, then through macrame, crocheting, knitting, spinning, crazy quilting, and finally, to various paper arts and mixed media. I like to work to prompts, such as challenges or themed swaps, more than I do just thinking up things myself. I’m sporadically active on Swapbot and ATCsForAll, and am in a 3-person mail art group which I really enjoy. I do a bit of art journaling, but enjoy making the journals more than actually writing in them. I live in Northern California with my husband, a goofy dog and a mean little parrot.
Blog: One Woman’s Hands
About The Contributors: Pam Fairchild, St. Joseph, Missouri: Pansy Cottage Creations

Hi, my name is Pam Fairchild a.k.a. Pansy Cottage Creations. I come from a long line of creative women on both sides of my family and luckily that gene continued with me. I’ve created and taught everything from embroidery, crochet and quilting to scrapbooking & card making. If I live long enough to deplete my fabric and paper stash I should be a ripe old age! I started scrapbooking in 2000 and was hooked very quickly thanks to a friend who I still crop with monthly. In 2010 I was introduced to rubber stamping, discovered Twitter and the world of Altered Art.
I have “met” so many talented people through these mediums and I follow so many blogs I can’t keep up. I am so inspired by their art that I feel a need to be in my studio at least for a few minutes a day. I am very lucky to have the largest room in our home as my studio and love that I can start a project, leave it and come back to work without having to start all over again each time. I hope my organization ideas help you in your journey to carve out a place of your own.
- Blog: Pansy Cottage Creations
- Etsy: Pansy Cottage Designs
About The Contributors: Lorri Flint
Lorri Flint is a textile artist, working with fabric, dye, thread and embellishments to create one of a kind art quilts. She has studied with numerous nationally and internationally recognized contemporary textile artists. Her award winning work has been juried into many local and regional shows and includes realistic as well as abstract themes.
Lorri is also a Jill-of-all-trades, with an accounting degree, an interest in website design and home remodeling. She LOVES her sewing machine (and her husband and her two sons in college) and has been sewing, knitting and making art as far back as she can remember! She’s always looking for ways to organize and manage her stuff. Her favorite ending to the day is to snuggle with a good book.
Having fun and learning something new is her goal for every class she teaches at Art Camp for Women. She provides detailed handouts with step-by-step instructions so that her students feel comfortable trying new techniques and can go home and experiment more. Her students frequently comment on how patient she is…something her husband might not agree with! The best art advice she has received is to “do what the piece requires” which means that she has been known to sewn 10,000+ beads onto one piece.


Love all the ideas and have tried a good many of them with success. I struggle with functionality versus my desire for tidiness!! Easier in my pottery studio where everything is supposed to be dirty!! Thanks for this week. I needed it!
I have been really inspired by these posts. My studio was in need of a good cleaning, but yesterday’s post on how your brain works made me realize it wasn’t just cleaning it needed, but a makeover!
I had been trying to keep it available for another person to craft with me, but the people who I had thought would do so have gone different directions and don’t have time for me. SO, I rearranged, reorganized and re-purposed some empty roll-around drawer units.
Now it is set up like I like it and once I get used to the new locations of things (I did label every drawer, box and basket!) I think it will be very functional.
I have rearranged my studio five times in the last seven months since we moved into this new house. I think I need to stop organizing and get busy creating!
Thanks for the inspiration!
tm
Lots to think about and the storage containers advice is right on. I had things in beautiful plastic containers and could never find what I wanted. I switched to open baskets and putting paper in kits (in plastic bags) and I can find my pp so much easier. Now I just need to organize the rest of my supplies (can I have more than one week please?)…LOL
Julie, don’t know what happened to my comment. It seemed to vanish. Here it is again.
Made this lazy susan craft organizer and love it. Need to make another one.
http://www.bloombakecreate.com/2011/07/krylon-dual-paint-craft-organizerwork-shoes-shelf/
Then posted about my organization of my craft cave even using dishwasher utencil holders.
http://www.bloombakecreate.com/2011/04/organizing-the-craft-stuff/
Thanks for the posts. Love to see how others are organizing.
I am drooling over all these wonderful tips!! I have dollar tins from Target to redecorate. I love those map drawers! It is really more important to find things quickly than have it in one big bin or a pretty one that obscures the items you are looking for. I repurposed an old nut and bolts storage drawer thing from my husband’s workshop for just that purpose!
these posts about organization are great! I got rid of many things when I moved in my new house and now it’s really easier to get organized! One of the keys is not to stack and stack and stack again, or you’ll end up overwhelmed and you don’t want to enter the room anymore:) thks!
I’m enjoying all the posts going back to the year in review! I like organization but I also get very enthused about fully exploring my creative processes and that passion drives me to collect all the great tools, papers and decorative elements – one person’s treasure. This past year I learned the value of shopper’s resistance too, & when to buy a little extra of the appropriate stuff. Planning what I CAN take on versus trying to do absolutely everything in full art-gusto mode, helps me filter out what I really don’t need. I’m using wheelie carts to organize frequently used supplies right now.
I have an old wooden printer’s tray that is very clean and has just been sitting empty against the wall – I think I need to see if it will fit in my drawer and then I can start organizing little bits and pieces as Leslie suggests – great idea, thank you!!
I’m really enjoying this series. Thank you so much. I am in love with that map drawer! What a dream!
I have a question. One of the things I have the hardest time with is my canvases. I have them propped up against the walls all over my house. Do you have any really good suggestions on how to organize them?
Thanks again for this!
Well be discussing what do do with finished artwork on Friday!
Lynda: Id love to have you put these links into the linky list in the post!
Thanks for doing this for us. Love it when people step us and do things that I just think about. I am cleaning vicariously through you and really enjoying it. I am more of the buy a new purse when the old one gets full gal. I have 2 stored in the back of the closet now just waiting to go thru. Maybe I’ll start small and sort thru them!
Thank you so much for this week! I love organizing but having outside input (rather than going round and round in my head) really helps and motivates.
When I knew this week was coming I installed 3 new sets of shelves and your tips are really helping with what to put where! Thanks again.
Looking forward to the post on what to do with finished artwork. Thanks for all the tips.
Some more great tips today. The two I plan on using are the toilet paper rolls in shoebox for pen storage (what a cool idea) and the foam core boxes. I love that they can be any size to fit a specific item – then I don’t have to keep hunting to find “just the right size”. Thanks Julie!
okey dokey – so all my craft possessions are now on the dining room table – and so the sorting, tossing and storing begins. Thanks so much for the little kick in the pants that got me started.
I think we should call it “structured chaos”. 🙂
The Lazy Susan idea was great! I forgot I had one stowed away… I finally put it to good use for my supplies this morning! Thanks Pam!
I have an old, shallow cabinet for CD’s that I’ve repurposed for punches and ink pads. Now I’m considering taking off the doors so it will be open. I have a smaller open CD storage thingy with 9 cubbies that I keep on my desk that holds the paint colors I use most often, a couple of stamp sets, archival ink, stickels, small bottles of gel medium and gesso, decorative tape and masking tape. All thanks to this week! Thanks!
Julie – just a small tip or request…whenever you get in the mood to “purge” your little projects or leftover scrap paper, think of your blog friends! I, for one, would love to have some of your littler projects – for Show & Tell! 🙂
Thanks for all the tips,
OK,I actually have enough storage thingies — foamcore is excellent for so many things! I want to add my thanks for this series and your wonderful contributors!
Loving these tips! Organization is my studio has always been fleeting — want to make it more of a permanent thing and a lot of these tips will help! Thanks!
Very colorful! Your piece looks so lively! Loved it!
I’ve been using a loaf tin to store frequently used adhesives (glue, gluedots, tapes, gluestick, redliner tape, etc.) for several months now! I love how easy it is to carry to the table and no looking around for the best adhesive for that particular job!
Julie, you’ve created a monster. I’m completely geeking out on Organization Week. I took a few photos of my studio in progress. Studio photos are at http://www.flickr.com/photos/technicalwritingprofessional/sets/72157628833333221/ I even reorganized my Pinterest to have a specific organization feed: http://pinterest.com/gwenzie/organization/ Suggestions/ideas are welcome.
I think I’ll combine the custom foam core idea into my supply drawers. It would be nice to be able to pull out a tray of pens/markers from a drawer and then put them back into the drawer when I’m done. I have a flat file that I user for paper, I can’t imagine using it to store anything else. I do need to figure out a way to get it up off the floor and still have usable storage.
This series has really got me thinking. I have tried to make my storage corner as tidy and attractive as I can because, well, my area is a tiny corner of the living room. But it’s just not practical. I just don’t bother with my papers as I have to lug out all the RUB’s on top to get to them. The paper storage you describe and the drawer storage makes much more sense.
I’m going to wait till OH has taken daughter to footie this week and am going to seriously organize my area!
So many great ideas! thanks for all the tips and for including other artists ideas & for all the photos. I know this has got to be a lot of work for you to put together, so many thanks for doing this!
I’m lusting after Lorri’s map drawers! I have a smaller version and it is my favorite piece of storage. And thanks to Lorri for that great tutorial of making compartments from Foam board! Love, love it. Will be great in my above-mentioned drawers. Julie, thanks for this week’s topic and your great ideas!
Thank you Julie for doing this organization week! I have realized I am so in need of this right now in my life and my craft room. I now have so many simple yet useful ideas because of the time you and your guests have taken for your readers’ sake. I so very sincerely appreciate what you have done here! Many, many thanks!
It’s really fun to create storage solutions for your house and for the office! Some people prefer doing these and others prefer to patronize the services of available companies. I mean, there could be some who are very busy in life that they can’t have enough time to add this activity to their schedule. I guess we all have different preferences depending on our schedules, right?
I know this has got to be a lot of work for you to put together, so many thanks for doing this!
These are so nice, Julie. Yeah, why not make storage extra artsy? I love the way you painted those buckets. This is definitely a crafter’s paradise. Look how an organized storage system brightens up a room! 🙂
I can’t confirm that either, but i agree with you on the camberwell now stuff…something weird having in mind the great productions that came out from Cold Storage. If i find some early issue from this albums i will post them so you can compare.
I love to organize with boxes as well. They can be used for so many things and I’ll make sure to save this post into my favorites for future reference! Thank you for sharing these great ideas!
Read more at http://www.kitchenstewardship.com/2009/05/26/monday-mission-rethink-plastic-food-storage-containers/#v8MgPk9Mwe2ZWw7J.99
I love that the blog played a role in your classroom organization. Thanks for reading! 🙂
I took an old tall wooden cabinet and had my husband turn it into a built-in unit. Inside are all the organized stuff for project not currently going, and I can just close the doors and access when needed. On my tabletop (I repurposed my old upper kitchen cupboards by hanging some and putting others on the floor. A big box store countertop-by-the-foot is attached allowing me knee room but still storage.) Current projects are organized and laid out within reach. I love using lid-less egg cartons and interesting tin cans for storage. thanks for even more! ideas.
Julie this was amazing! I am so happy that i have found your blog. I feel really happy when I have something to organize or store. Thank you for sharing this post! Greetings!
Pingback: Art Supply Organization Week - Balzer Designs Blog