
Back in April, a woman named Gladi Porsche was the speaker at the monthly meeting for the Quilters Connection Quilt Guild. She brought tons of gorgeous quilts. They were not the kind of quilt I usually make, but I found them inspiring and breathtaking nonetheless.
I was particularly fascinated by a series of quilts she had brought featuring an old traditional block called the "Palm Leaf."
You can see that by simple rearranging how the blocks relate to each other, you get incredibly different looks! Swoon!
I decided that although I am not a traditional quilter, I wanted to make a Palm Leaf quilt of my own! So, I drafted a pattern in Adobe Illustrator and then sent it to my ScanNCut for cutting (this way there was not a single moment of measuring or math — my kind of quilting).
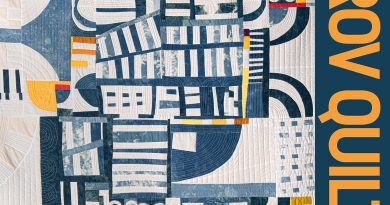
I chose to cut all of the pieces out of commercial blue batiks I had sitting around. I made 12 blocks — each about 12×12. I've been playing with various arrangements and these are my current 3 favorites:
I wish I had a big giant design wall so I didn't have to crawl around the floor with these blocks, but alas there is no open wall in my apartment. Perhaps in the next studio? In the meantime, I'm going to keep shuffling these blocks around until I feel like the design is "right." I might add some sashing…or even a few more blocks. I'm going to mull it over….
Thanks for stopping by!
Love these quilts. I want to make a stamp for to experiment with patterns.
Love these quilts. I want to make a stamp for to experiment with patterns.
Love these quilts. I want to make a stamp for to experiment with patterns.
Love these quilts. I want to make a stamp for to experiment with patterns.
Love these quilts. I want to make a stamp for to experiment with patterns.
Love these quilts. I want to make a stamp for to experiment with patterns.
Love these quilts. I want to make a stamp for to experiment with patterns.
Thank you so much for this information!! I, too, am not a traditional quilter and I LOVE what you took from that and love your squares! Thank you SOO much for sharing-now I want to make one too.
Thank you so much for this information!! I, too, am not a traditional quilter and I LOVE what you took from that and love your squares! Thank you SOO much for sharing-now I want to make one too.
Thank you so much for this information!! I, too, am not a traditional quilter and I LOVE what you took from that and love your squares! Thank you SOO much for sharing-now I want to make one too.
Thank you so much for this information!! I, too, am not a traditional quilter and I LOVE what you took from that and love your squares! Thank you SOO much for sharing-now I want to make one too.
Thank you so much for this information!! I, too, am not a traditional quilter and I LOVE what you took from that and love your squares! Thank you SOO much for sharing-now I want to make one too.
Thank you so much for this information!! I, too, am not a traditional quilter and I LOVE what you took from that and love your squares! Thank you SOO much for sharing-now I want to make one too.
Thank you so much for this information!! I, too, am not a traditional quilter and I LOVE what you took from that and love your squares! Thank you SOO much for sharing-now I want to make one too.
These are gorgeous! Make more blocks, more blocks!
These are gorgeous! Make more blocks, more blocks!
These are gorgeous! Make more blocks, more blocks!
These are gorgeous! Make more blocks, more blocks!
These are gorgeous! Make more blocks, more blocks!
These are gorgeous! Make more blocks, more blocks!
These are gorgeous! Make more blocks, more blocks!
I like the top one the best! These are extraordinarily beautiful! Great job, Jules!
I like the top one the best! These are extraordinarily beautiful! Great job, Jules!
I like the top one the best! These are extraordinarily beautiful! Great job, Jules!
I like the top one the best! These are extraordinarily beautiful! Great job, Jules!
I like the top one the best! These are extraordinarily beautiful! Great job, Jules!
I like the top one the best! These are extraordinarily beautiful! Great job, Jules!
I like the top one the best! These are extraordinarily beautiful! Great job, Jules!
Great job Julie, I like th last one the best!
Great job Julie, I like th last one the best!
Great job Julie, I like th last one the best!
Great job Julie, I like th last one the best!
Great job Julie, I like th last one the best!
Great job Julie, I like th last one the best!
Great job Julie, I like th last one the best!
Julie, you know how the felt at the fabric store comes in a very wide width? You can create your own Portable (i.e., temporary) Quilt Design Wall if you have a space (like in front of storage shelving for instance?) by tacking/tie/button/tape the corners & center top of the big piece of felt up!! Here’s another Quilt Design tip: there is a little thing called a Door Viewer that’s available at hardware stores–It’s for seeing who is outside the door before you open it. This little beauty is like a looking through the wrong end of the binoculars: You can be standing 2 feet away from your quilt wall & the viewer puts you further away (somehow) so that you can see your whole design & evaluate contrasts/balance/continuity etc. Get the larger Door Viewer (if they have it)–easier to see the whole quilt wall. I used to quilt in a 6’x9l’ shed–no way could I stand back & evaluate how my quilt design was working. The Door Viewer made it possible. P.S. LOVE the Palm pattern! You’re gonna love your quilt!!
Julie, you know how the felt at the fabric store comes in a very wide width? You can create your own Portable (i.e., temporary) Quilt Design Wall if you have a space (like in front of storage shelving for instance?) by tacking/tie/button/tape the corners & center top of the big piece of felt up!! Here’s another Quilt Design tip: there is a little thing called a Door Viewer that’s available at hardware stores–It’s for seeing who is outside the door before you open it. This little beauty is like a looking through the wrong end of the binoculars: You can be standing 2 feet away from your quilt wall & the viewer puts you further away (somehow) so that you can see your whole design & evaluate contrasts/balance/continuity etc. Get the larger Door Viewer (if they have it)–easier to see the whole quilt wall. I used to quilt in a 6’x9l’ shed–no way could I stand back & evaluate how my quilt design was working. The Door Viewer made it possible. P.S. LOVE the Palm pattern! You’re gonna love your quilt!!
Julie, you know how the felt at the fabric store comes in a very wide width? You can create your own Portable (i.e., temporary) Quilt Design Wall if you have a space (like in front of storage shelving for instance?) by tacking/tie/button/tape the corners & center top of the big piece of felt up!! Here’s another Quilt Design tip: there is a little thing called a Door Viewer that’s available at hardware stores–It’s for seeing who is outside the door before you open it. This little beauty is like a looking through the wrong end of the binoculars: You can be standing 2 feet away from your quilt wall & the viewer puts you further away (somehow) so that you can see your whole design & evaluate contrasts/balance/continuity etc. Get the larger Door Viewer (if they have it)–easier to see the whole quilt wall. I used to quilt in a 6’x9l’ shed–no way could I stand back & evaluate how my quilt design was working. The Door Viewer made it possible. P.S. LOVE the Palm pattern! You’re gonna love your quilt!!
Julie, you know how the felt at the fabric store comes in a very wide width? You can create your own Portable (i.e., temporary) Quilt Design Wall if you have a space (like in front of storage shelving for instance?) by tacking/tie/button/tape the corners & center top of the big piece of felt up!! Here’s another Quilt Design tip: there is a little thing called a Door Viewer that’s available at hardware stores–It’s for seeing who is outside the door before you open it. This little beauty is like a looking through the wrong end of the binoculars: You can be standing 2 feet away from your quilt wall & the viewer puts you further away (somehow) so that you can see your whole design & evaluate contrasts/balance/continuity etc. Get the larger Door Viewer (if they have it)–easier to see the whole quilt wall. I used to quilt in a 6’x9l’ shed–no way could I stand back & evaluate how my quilt design was working. The Door Viewer made it possible. P.S. LOVE the Palm pattern! You’re gonna love your quilt!!
Julie, you know how the felt at the fabric store comes in a very wide width? You can create your own Portable (i.e., temporary) Quilt Design Wall if you have a space (like in front of storage shelving for instance?) by tacking/tie/button/tape the corners & center top of the big piece of felt up!! Here’s another Quilt Design tip: there is a little thing called a Door Viewer that’s available at hardware stores–It’s for seeing who is outside the door before you open it. This little beauty is like a looking through the wrong end of the binoculars: You can be standing 2 feet away from your quilt wall & the viewer puts you further away (somehow) so that you can see your whole design & evaluate contrasts/balance/continuity etc. Get the larger Door Viewer (if they have it)–easier to see the whole quilt wall. I used to quilt in a 6’x9l’ shed–no way could I stand back & evaluate how my quilt design was working. The Door Viewer made it possible. P.S. LOVE the Palm pattern! You’re gonna love your quilt!!
Julie, you know how the felt at the fabric store comes in a very wide width? You can create your own Portable (i.e., temporary) Quilt Design Wall if you have a space (like in front of storage shelving for instance?) by tacking/tie/button/tape the corners & center top of the big piece of felt up!! Here’s another Quilt Design tip: there is a little thing called a Door Viewer that’s available at hardware stores–It’s for seeing who is outside the door before you open it. This little beauty is like a looking through the wrong end of the binoculars: You can be standing 2 feet away from your quilt wall & the viewer puts you further away (somehow) so that you can see your whole design & evaluate contrasts/balance/continuity etc. Get the larger Door Viewer (if they have it)–easier to see the whole quilt wall. I used to quilt in a 6’x9l’ shed–no way could I stand back & evaluate how my quilt design was working. The Door Viewer made it possible. P.S. LOVE the Palm pattern! You’re gonna love your quilt!!
Julie, you know how the felt at the fabric store comes in a very wide width? You can create your own Portable (i.e., temporary) Quilt Design Wall if you have a space (like in front of storage shelving for instance?) by tacking/tie/button/tape the corners & center top of the big piece of felt up!! Here’s another Quilt Design tip: there is a little thing called a Door Viewer that’s available at hardware stores–It’s for seeing who is outside the door before you open it. This little beauty is like a looking through the wrong end of the binoculars: You can be standing 2 feet away from your quilt wall & the viewer puts you further away (somehow) so that you can see your whole design & evaluate contrasts/balance/continuity etc. Get the larger Door Viewer (if they have it)–easier to see the whole quilt wall. I used to quilt in a 6’x9l’ shed–no way could I stand back & evaluate how my quilt design was working. The Door Viewer made it possible. P.S. LOVE the Palm pattern! You’re gonna love your quilt!!
Fabulous blocks Julie. Now I want to make them too.
You might want to make one more of each block. Then try starting with the darkest going down on the diagonal and fill in with the rest. Or… make 4 large blocks using one of each of the smaller ones. Then rotate and play with them until you like it.
Stay crazy Boston!
JC
Just buy a piece of white flannel from Joanne’s or your local store and tape it to the wall – instant design wall! You can pin or just smooth the blocks against it and they will stick.
Just buy a piece of white flannel from Joanne’s or your local store and tape it to the wall – instant design wall! You can pin or just smooth the blocks against it and they will stick.
Just buy a piece of white flannel from Joanne’s or your local store and tape it to the wall – instant design wall! You can pin or just smooth the blocks against it and they will stick.
Just buy a piece of white flannel from Joanne’s or your local store and tape it to the wall – instant design wall! You can pin or just smooth the blocks against it and they will stick.
Just buy a piece of white flannel from Joanne’s or your local store and tape it to the wall – instant design wall! You can pin or just smooth the blocks against it and they will stick.
Just buy a piece of white flannel from Joanne’s or your local store and tape it to the wall – instant design wall! You can pin or just smooth the blocks against it and they will stick.
Just buy a piece of white flannel from Joanne’s or your local store and tape it to the wall – instant design wall! You can pin or just smooth the blocks against it and they will stick.
Portable,storable-friendly design wall: Buy a 2” thick 4’x8’ piece of insulation board and have it cut in half at the store. I have gotten mine from Lowe’s – silver foil on one side, but white on the other. (No charge for the first cut.) This is firm and can be pinned into. I have designed many quilts on mine. Also you can pin flannel over it it you want a flannel wall, but I prefer to stab pins in, and I can move it easily.
Portable,storable-friendly design wall: Buy a 2” thick 4’x8’ piece of insulation board and have it cut in half at the store. I have gotten mine from Lowe’s – silver foil on one side, but white on the other. (No charge for the first cut.) This is firm and can be pinned into. I have designed many quilts on mine. Also you can pin flannel over it it you want a flannel wall, but I prefer to stab pins in, and I can move it easily.
Portable,storable-friendly design wall: Buy a 2” thick 4’x8’ piece of insulation board and have it cut in half at the store. I have gotten mine from Lowe’s – silver foil on one side, but white on the other. (No charge for the first cut.) This is firm and can be pinned into. I have designed many quilts on mine. Also you can pin flannel over it it you want a flannel wall, but I prefer to stab pins in, and I can move it easily.
Portable,storable-friendly design wall: Buy a 2” thick 4’x8’ piece of insulation board and have it cut in half at the store. I have gotten mine from Lowe’s – silver foil on one side, but white on the other. (No charge for the first cut.) This is firm and can be pinned into. I have designed many quilts on mine. Also you can pin flannel over it it you want a flannel wall, but I prefer to stab pins in, and I can move it easily.
Portable,storable-friendly design wall: Buy a 2” thick 4’x8’ piece of insulation board and have it cut in half at the store. I have gotten mine from Lowe’s – silver foil on one side, but white on the other. (No charge for the first cut.) This is firm and can be pinned into. I have designed many quilts on mine. Also you can pin flannel over it it you want a flannel wall, but I prefer to stab pins in, and I can move it easily.
Portable,storable-friendly design wall: Buy a 2” thick 4’x8’ piece of insulation board and have it cut in half at the store. I have gotten mine from Lowe’s – silver foil on one side, but white on the other. (No charge for the first cut.) This is firm and can be pinned into. I have designed many quilts on mine. Also you can pin flannel over it it you want a flannel wall, but I prefer to stab pins in, and I can move it easily.
Portable,storable-friendly design wall: Buy a 2” thick 4’x8’ piece of insulation board and have it cut in half at the store. I have gotten mine from Lowe’s – silver foil on one side, but white on the other. (No charge for the first cut.) This is firm and can be pinned into. I have designed many quilts on mine. Also you can pin flannel over it it you want a flannel wall, but I prefer to stab pins in, and I can move it easily.
Julie
My husband devised a great portable/temporary design wall for me.
He bought insulation foam board at Home Depot and cut two pieces to fit over two tall side-by-side bookcases. With one length of elastic, I strap the ends around the two foam boards standing against the bookcases, then cover the whole thing with flannel. The set up takes about three minutes. I took photos to show you but don’t see how to include them here!
Penny
I love the design and all the colors…so beautiful! You could print one of the above photos, cut out all the individual squares and use them to arrange until you find what you like best. Your design would make a beautiful card too!
I love the design and all the colors…so beautiful! You could print one of the above photos, cut out all the individual squares and use them to arrange until you find what you like best. Your design would make a beautiful card too!
I love the design and all the colors…so beautiful! You could print one of the above photos, cut out all the individual squares and use them to arrange until you find what you like best. Your design would make a beautiful card too!
I love the design and all the colors…so beautiful! You could print one of the above photos, cut out all the individual squares and use them to arrange until you find what you like best. Your design would make a beautiful card too!
I love the design and all the colors…so beautiful! You could print one of the above photos, cut out all the individual squares and use them to arrange until you find what you like best. Your design would make a beautiful card too!
I love the design and all the colors…so beautiful! You could print one of the above photos, cut out all the individual squares and use them to arrange until you find what you like best. Your design would make a beautiful card too!
I love the design and all the colors…so beautiful! You could print one of the above photos, cut out all the individual squares and use them to arrange until you find what you like best. Your design would make a beautiful card too!
Why not scan them and rearrange them on the computer?
Why not scan them and rearrange them on the computer?
Why not scan them and rearrange them on the computer?
Why not scan them and rearrange them on the computer?
Why not scan them and rearrange them on the computer?
Why not scan them and rearrange them on the computer?
Why not scan them and rearrange them on the computer?
Love your beautiful efforts,recognize some batik patterns from my stash..ha Really appreciate you utilizing Illustrator and Scan n Cut…best investment I ever made with Photoshop for total fun and magic. Renn
Love your beautiful efforts,recognize some batik patterns from my stash..ha Really appreciate you utilizing Illustrator and Scan n Cut…best investment I ever made with Photoshop for total fun and magic. Renn
Love your beautiful efforts,recognize some batik patterns from my stash..ha Really appreciate you utilizing Illustrator and Scan n Cut…best investment I ever made with Photoshop for total fun and magic. Renn
Love your beautiful efforts,recognize some batik patterns from my stash..ha Really appreciate you utilizing Illustrator and Scan n Cut…best investment I ever made with Photoshop for total fun and magic. Renn
Love your beautiful efforts,recognize some batik patterns from my stash..ha Really appreciate you utilizing Illustrator and Scan n Cut…best investment I ever made with Photoshop for total fun and magic. Renn
Love your beautiful efforts,recognize some batik patterns from my stash..ha Really appreciate you utilizing Illustrator and Scan n Cut…best investment I ever made with Photoshop for total fun and magic. Renn
Love your beautiful efforts,recognize some batik patterns from my stash..ha Really appreciate you utilizing Illustrator and Scan n Cut…best investment I ever made with Photoshop for total fun and magic. Renn
I think you could make a number of baby quilts. don’t you
I think you could make a number of baby quilts. don’t you
I think you could make a number of baby quilts. don’t you
I think you could make a number of baby quilts. don’t you
I think you could make a number of baby quilts. don’t you
I think you could make a number of baby quilts. don’t you
I think you could make a number of baby quilts. don’t you
Please do a tutorial on how you made the blocks with the scanncut. Are they sewn or fused?
Please do a tutorial on how you made the blocks with the scanncut. Are they sewn or fused?
Please do a tutorial on how you made the blocks with the scanncut. Are they sewn or fused?
Please do a tutorial on how you made the blocks with the scanncut. Are they sewn or fused?
Please do a tutorial on how you made the blocks with the scanncut. Are they sewn or fused?
Please do a tutorial on how you made the blocks with the scanncut. Are they sewn or fused?
Please do a tutorial on how you made the blocks with the scanncut. Are they sewn or fused?
My OCD needs a more traditional type of pattern. Things not in strict order do my head in lol you’re right about theScan N Cut making life easier.
My OCD needs a more traditional type of pattern. Things not in strict order do my head in lol you’re right about theScan N Cut making life easier.
My OCD needs a more traditional type of pattern. Things not in strict order do my head in lol you’re right about theScan N Cut making life easier.
My OCD needs a more traditional type of pattern. Things not in strict order do my head in lol you’re right about theScan N Cut making life easier.
My OCD needs a more traditional type of pattern. Things not in strict order do my head in lol you’re right about theScan N Cut making life easier.
My OCD needs a more traditional type of pattern. Things not in strict order do my head in lol you’re right about theScan N Cut making life easier.
My OCD needs a more traditional type of pattern. Things not in strict order do my head in lol you’re right about theScan N Cut making life easier.
I love the design and all the colors.thanks
I love the design and all the colors.thanks
I love the design and all the colors.thanks
I love the design and all the colors.thanks
I love the design and all the colors.thanks
I love the design and all the colors.thanks
I love the design and all the colors.thanks