
You’ve seen me use a Thermofax machine to make my own screens. But it’s a rare and expensive machine. Well, my friend Jenn Mason came up with a brilliant idea that we’re sharing in this video all about how to make your own custom silk screens for screen printing using the ScanNCut and it’s low effort (I love it)!
Screen printing is a versatile and fun way to add custom designs to fabric, paper, and more. Whether you’re a seasoned artist or a curious beginner, making your own screen is easier than you might think. Here’s what you need:
- ScanNCut Machine (or cut the vinyl by hand)
- Heat Transfer Vinyl (HTV)
- Sheer Fabric
Watch the video for the how-to:
Be sure to check out my class all about screen printing at home — no ScanNCut machine required. And I even have a blog post all about screen printing on cookies! Note: For the most up to date ScanNCut tutorials, join my ScanNCut Club on YouTube and get new tutorial videos every month!
Three Steps to Making Your Own Screens with a ScanNCut
Step 1: Design and Cut Your Screen
- Scan Your Design: Start by scanning your design into the ScanNCut machine. I used a handwritten name, but any design works. Once scanned, adjust the settings to capture all the details, including smaller elements like dots on letters.
- Prepare the Heat Transfer Vinyl: Place the heat transfer material shiny side down on the cutting mat. This ensures you only cut through the material, leaving the clear transfer sheet intact.
- Cut the Design: Load the mat into the machine and cut the design. Make sure your blade settings are correct by performing a test cut first.
If you don’t own an electronic cutter, like the ScanNCut, you can absolutely use a craft knife and a cutting mat to cut the HTV.
Step 2: Assemble Your Screen
- Weed the Vinyl: Once your design is cut, weed out the parts you don’t need, leaving the design on the transfer sheet. The part you weed out is the part that will appear when you screen print. The ink will go through this empty space.
- Iron the Design to Sheer Fabric: Position the design on sheer fabric and use a hot iron with a pressing cloth to adhere it securely. Ironing melts the heat activated adhesive on the HTV.
- Tape the Screen: After attaching the design, peel off the backing and tape the edges of the fabric with duct tape. This creates an inexpensive frame that makes printing easier.
Step 3: Screen Print Your Design
- Prepare Your Surface: If you’re printing on fabric, place a piece of cardboard or similar material inside your fabric item (e.g., a T-shirt or pencil case) to prevent ink from bleeding through.
- Apply the Ink: Use a thick, heavy-bodied paint or screen printing ink. With a hotel key card or old gift card, spread the ink evenly across the screen, holding the card at a 45-degree angle and applying firm pressure.
- Reveal Your Print Carefully lift the screen to reveal your design. If there are any imperfections, embrace them or layer the design for a unique look.
Why Make Your Own Screen?
There are so many reasons why an artist or a maker might want to make their own custom screens:
Personalized Designs: A custom silk screen allows you to transfer your unique drawings, patterns, or designs onto various surfaces. This adds a personal touch to your artwork and helps distinguish your art from others.
Reproducibility: Screen printing enables you to create multiple consistent impressions of the same design. This is useful for producing prints, fabrics, or elements for collages that require uniformity.
Texture and Layering: Screen printing adds texture to a piece, which is valuable for mixed media work. The printed elements can be layered over other materials, creating depth and complexity.
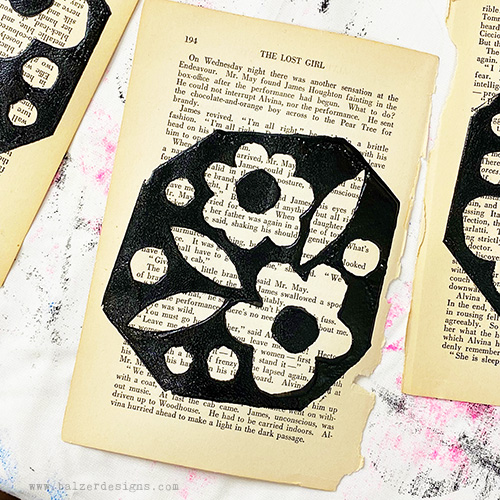
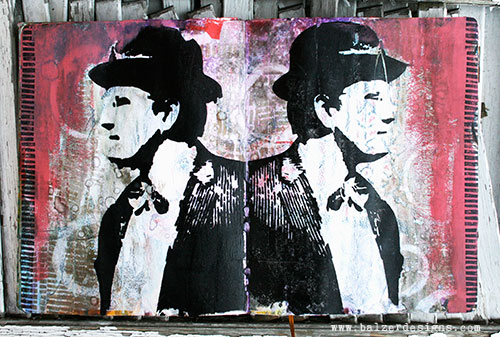
Experimentation with Materials: Silk screens can be used with various media, such as acrylic paint, fabric ink, or even gel mediums. This versatility allows you to experiment with different effects on paper, fabric, wood, or canvas. Here is some screen printing I did on a pillow case (bird image):

Integration of Text: Custom screens can incorporate text elements, such as quotes, words, or typography, that integrate seamlessly into the artwork. This is especially useful for artists who like to combine visual art with written messages.
Creative Control: By designing your own silk screens, you have complete control over the size, placement, and intricacy of the printed elements, enabling you to achieve your vision without relying on store-bought stencils or designs made with other people’s ideas.

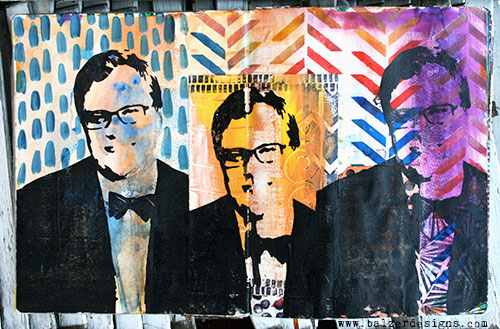
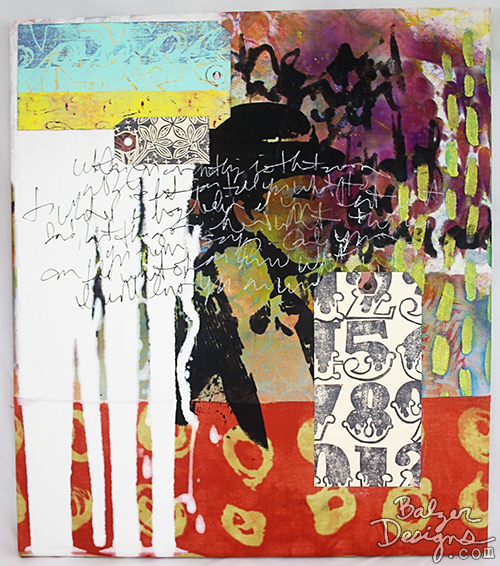
Cost-Effectiveness for Repeated Use: Once a custom silk screen is made, it can be reused multiple times, making it a cost-effective tool for adding custom elements to a variety of artworks, as shown in this art journal spread and mixed media wall art piece:
Overall, a custom silk screen offers you a versatile and creative tool to enhance your art with your own unique point-of-view. Plus, how cool is it that you can use your electronic cutter?! No need for an expensive Thermofax machine or messy screen burning solvents! I hope that you’ll try creating a custom screen at home! (Don’t forget to check out my class all about making custom screens at home — no ScanNCut machine required.)
Happy screen printing!

How cool is this! Thanks Julie and Jenn!! May have to watch it a couple of times, but your directions are wonderful. New technique and supplies for me…
Great video!
Um…brilliant!!!! My mouth was agape the whole time I was watching!! Thank you for sharing the genius of Jenn + Julie!!
Can you provide info on the heat transfer material used?
I added links for all the supplies to the post. Hope that helps!
Thank you!
How cool is that? How many times did it take with the practice cut to get it so the backing didn’t cut? Or does that matter? Looking forward to giving this a try!
Once or twice. Once you figure it out, it works every time. You do need to keep the backing on so that the insides of the letters transfer perfectly.
Excellent idea.
Thank you, I will definitely have a try at this procedure.
I am now off the fence about buying the brother scan n cut! Where do you recommend to purchase this baby? I’ve been wanting one to make my own stencil designs, but this really takes it up to a whole new level, and km pretty sure this is one tool I can no longer live without. Thank you, Julie and Jenny for sharing!!
If you buy from a Brother Dealer you often get some free classes. If you buy from HSN, you usually get a great price and some extra goodies. I think those are the two best options. 🙂
totally cool! Adding to my wish list
So you guys have just sold me on the idea of buying a Scan’N’Cut! Hehe Thanks for this awesome tutorial!
Went out and bought some organza today to give this a go. Thanks so much for your amazing tutorials.
Hi,
Could you tell me the dimensions??
Thanks, I’m intending to use this for tee printing if it’s large enough. Possible??
Thank you! Great instructions. I definitely need to try this!
I cannot find your supply list to know what kind of material to use. Also what material did you use for the cookies?
hi. great video.. would the scan n cut be able to cut maller wording i.e a poem script or would it be too detailed to cut? thanks x