
Hello and welcome! Thank you, Julie, for allowing me the opportunity to share with your readers. Its an honor to be featured here on your blog.
Today I’d like to share my technique for creating gorgeous stenciled tissue paper prints to use in collage, journal pages and mixed media projects. Let’s get started!
Gather your supplies:
- Balzer Designs Stencils (of course!)
- Tissue paper: printed/plain, sewing pattern paper, deli paper (matte side), gift tissue, bleeding tissue
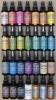
- Spray inks
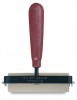
- Optional: Soft brayer, paper towel roll, acrylic sprays
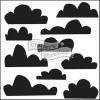
Next, cover your work surface – butcher paper, rosin, watercolor, newsprint, scrapbook paper – whatever you have handy will do nicely. Select your tissue papers, stencils and sprays. Here I’m using two (well loved and used) stencils:
Spray the ink over the tissue using a sweeping motion:
Let the ink settle into the paper for a few seconds. There are two options for the next step.
Mirror Image Technique:
Create a mirror image by laying another piece of tissue paper over the stencil, pattern side down. Smooth paper gently with your hands, a paper towel roll or soft brayer. Tissue paper is delicate, so you may get wrinkles as you lay the second sheet down. Don’t fret! These imperfections create beautiful marks. Wait a few seconds then remove the top layer.
On the left is the stenciled tissue paper, and the mirrored image paper is on the right. Notice that the dried layers of color was released from the stencil onto the (mirrored) paper. Set aside to dry.
Ghost Imprint Technique:
For this step, remove the stencil(s) while still wet, and turn the sprayed side down onto your work surface paper. Use a brayer to release the ink.
Or, apply wet side stencil directly onto the tissue you just stenciled. In other words, put the stenciled sprayed side onto the tissue paper itself and you’ll create this look:
Easy! Here are more samples:
I also tried this technique using bleeding tissue paper. Notice how the color of the bleeding tissue paper – and not the white spray ink – imprinted onto the mirror image tissue paper.
And here’s what your work surface will eventually look like:
I hope this has inspired you to grab from your stash and try these techniques! Here are more tips:
- Tissue paper varies in weight. If you are using very thin tissue, spray lightly. Or, place more tissue underneath to catch the excess ink. You can always add more color once it dries.
- Do not to spray too closely or directly on top of your stencil as you risk creating a pool of ink on the paper. If that happens, quickly blot with heavier weight paper or a paper towel and let dry completely. Hold the bottle at an angle and use a sweeping motion to apply the spray. Watch Heidi Swapp’s Color Shine videos for this application.
- My favorite tissue papers:
- Tim Holtz idea-ology tissue wrap
- Anthropologie gift tissue – I call it ‘kraft tissue’ because the color resembles kraft paper
- Glittered tissue paper
- Spray.Print.Repeat. Work big – change it up by mixing your selection of stencils and sprays. You may or may not want to let it dry between applications. Either way, you’ll achieve beautiful layers of color and design.
- Create a masterpiece? Use your favorite medium and apply it to a canvas board, watercolor paper or turn it into a journal cover.
- If you don’t want to include the stencil borders on your papers, position the stencil off the page and mask the rest. You can also use multiple stencils overlapping one another or just use a 12×12 size stencil and mask if necessary. In fact, be sure to stencil the paper used for your mask!
- Keep in mind that the residual ink from your stencils can show up in your original and/or ghost prints. This can be a good thing. . .
- If you’re planning to do copious amounts of papers, move your finished work to another area. It’s really easy to get into a groove and start spraying away, so be aware that you risk spraying over your finished papers. But then again, the results can be beautiful.
- Colors will vary depending on the spray inks you use. For vibrant, saturated colors, use Dylusions, Adirondack and the like. For a softer look, Heidi Swapp Color Shine (shimmer! yes, please), chalk sprays and Tim Holtz’ Distressed Sprays are really nice options. I’ve also used Montana Gold acrylic spray paint and the application is a bit heavier, but it works! You can certainly use a combination of these products for an eclectic look.
- If you are using your hands instead of a paper towel roll or a brayer, be sure to wash them periodically.
- No spray ink? Use alcohol ink with an applicator pad or use ink/stamp pads. With ink pads you won’t be able to use the mirror technique (ink dries too quickly), but it’s just as lovely.
Have fun and experiment! I can’t wait to use these papers in my artwork and journals. Thanks for playing along. . .
Supplies used:
                  |
Hello~ My name is Char DeRouin. I live in Silicon Valley where I keep grounded by infusing art, creativity and love into my everyday life and that of my family.
For me, artistry is not just the physical act of painting, designing and building costumes, or working with paper; its also [my] state of mind. I am always thinking, planning, and dreaming up ideas of things I can do and create. Sometimes these snippets of inspiration stay in my head longer than I’d like, but hey, all in good time. It’s important to work from a good place, from intuition and feeling, and allowing things to flow. I relish getting lost in the creative process.
Visit me at www.charderouin.com
Char, thanks for the techniques and inspiration!
Char, thanks for the techniques and inspiration!
Char, thanks for the techniques and inspiration!
Char, thanks for the techniques and inspiration!
Char, thanks for the techniques and inspiration!
Fantastic post … something I feel like I as a beginner can do and make a big impact. Thanks so much, Char … really great post!
Fantastic post … something I feel like I as a beginner can do and make a big impact. Thanks so much, Char … really great post!
Fantastic post … something I feel like I as a beginner can do and make a big impact. Thanks so much, Char … really great post!
Fantastic post … something I feel like I as a beginner can do and make a big impact. Thanks so much, Char … really great post!
Fantastic post … something I feel like I as a beginner can do and make a big impact. Thanks so much, Char … really great post!
Great techniques!
Great techniques!
Great techniques!
Great techniques!
Great techniques!
Great advice! You’re right about the sweeping motion when spraying, I learned that the hard way! 🙂
Great advice! You’re right about the sweeping motion when spraying, I learned that the hard way! 🙂
Great advice! You’re right about the sweeping motion when spraying, I learned that the hard way! 🙂
Great advice! You’re right about the sweeping motion when spraying, I learned that the hard way! 🙂
Great advice! You’re right about the sweeping motion when spraying, I learned that the hard way! 🙂
Char! what fantastic prints you got with your tissue paper.
Thanks for the great ideas!!
Char! what fantastic prints you got with your tissue paper.
Thanks for the great ideas!!
Char! what fantastic prints you got with your tissue paper.
Thanks for the great ideas!!
Char! what fantastic prints you got with your tissue paper.
Thanks for the great ideas!!
Char! what fantastic prints you got with your tissue paper.
Thanks for the great ideas!!
wow oh wow!! will have to try this one
wow oh wow!! will have to try this one
wow oh wow!! will have to try this one
wow oh wow!! will have to try this one
wow oh wow!! will have to try this one