
Before it's too distant a memory, I thought I'd share some Valentine's Day cards that I made.
I used several techniques that I've shared before.
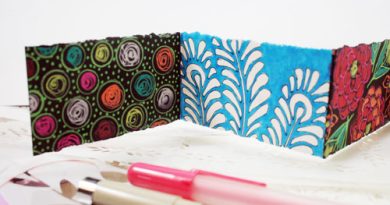
The fronts of the cards are wood inlay.
You can see this technique in this video using two different colors of wood veneer. For my cards I used cardstock and wood veneer. I love the look you get from embedding or inlaying the veneer rather than gluing it on top of the card front.
The heart card opens in a few different directions:
I shared this exploding card technique in this video and you can see me stamping and masking the piece of paper with the heart in this instagram video. Here's a detail of that paper:
The tree card has a secret inside as well!
I love the way pop-ups look. They're so simple to do and yet really give some oomph to your greeting cards.
Of course, I "signed" the back of both cards with some hand carved stamps and embossing powder:
Finally, no card is complete without a beautiful envelope. These are the ones I made:
These were fun to make and fun to give. Definitely worth the time and effort to see the smiles on the recipients' faces!
Thanks for stopping by!

WOW! You are amazing and these cards are so amazing!! I love it from beginning to end. The lucky people who received these gems! I would love to see a video of the process of folding your paper and also your beautiful envelope. I love seeing it all of “what Julie made”! Beautiful!
WOW! You are amazing and these cards are so amazing!! I love it from beginning to end. The lucky people who received these gems! I would love to see a video of the process of folding your paper and also your beautiful envelope. I love seeing it all of “what Julie made”! Beautiful!
WOW! You are amazing and these cards are so amazing!! I love it from beginning to end. The lucky people who received these gems! I would love to see a video of the process of folding your paper and also your beautiful envelope. I love seeing it all of “what Julie made”! Beautiful!
WOW! You are amazing and these cards are so amazing!! I love it from beginning to end. The lucky people who received these gems! I would love to see a video of the process of folding your paper and also your beautiful envelope. I love seeing it all of “what Julie made”! Beautiful!
WOW! You are amazing and these cards are so amazing!! I love it from beginning to end. The lucky people who received these gems! I would love to see a video of the process of folding your paper and also your beautiful envelope. I love seeing it all of “what Julie made”! Beautiful!
WOW! You are amazing and these cards are so amazing!! I love it from beginning to end. The lucky people who received these gems! I would love to see a video of the process of folding your paper and also your beautiful envelope. I love seeing it all of “what Julie made”! Beautiful!
Your cards are awesome and lucky are the receivers!
Your cards are awesome and lucky are the receivers!
Your cards are awesome and lucky are the receivers!
Your cards are awesome and lucky are the receivers!
Your cards are awesome and lucky are the receivers!
Your cards are awesome and lucky are the receivers!
Hi Julie,
I see a greeting card designs and you selling them on your Esty site and your other sites. In your future.
Beautifully done with your Brother scan n cut. I think your next go around with HSN you should show these technique as the finished product. I did see you show the DAD cut with veneer wood on HSN. I have yet to attempt that. It is on my list.
I love the envelopes. I have see these also made with scoring boards. The card that opens in several direction would give some venders a run for their money.
These cards and envelopes are just tremendous. I love what you have done here. Very unique and very pretty. I think your marbling paper would work very well for greeting cards and envelopes.
Did you emboss with the scan n cut first, then go over it with the embossing pen and powder or did you just use an embossing pen and the power?
I have the Brother scan n cut embossing kit.
I am not sure if I use the embossing mat with paper as well as the aluminum sheets. I want to try it out on paper first and see how it does. I did see your video on using the metal sheets as well as the region embossing. Paper for region? I will have to go back and look at it again. I just want to try the line embossing first.
Again another fantastic project. I am sure the recipients really loved them and I hope they save them as some day your creations will become collectors items.
Happy Monday
Fawna
This is one of the things why I am such a big fan of you. You think about all these details and nothing is plain simple. Even the back of the envelope has this super cool sticker to close it. Totally love these projects! The other day I needed to cook (sometimes I hate it even more than other times) and enjoyed your latest podcast. It’s like I’m part of the conversation you have with your mum, which makes me happy 🙂 You both are great people with so many great ideas about…well about anything and everything 🙂
xx Michelle
Stunning! You don’t spare the finer details in these wonderful gifts do you…. I am hoping to watch the videos you have included again and try this soon. I have learned much of what I know about my SNC from you! Thanks for all the creativity 🙂
P.S. I used the embossing tools to emboss on vellum, Worked like a charm! Now I just need to figure out how to keep the vellum from getting all curly from the glue and glitter! See my instagram post @kimsdesigns
Beautiful work Julie!
Beautiful work Julie!
Beautiful work Julie!
Beautiful work Julie!
Beautiful work Julie!
Beautiful work Julie!
I absolutely love the Valentine cards you created, Julie! You mom must be so happy!! Do you have a video on how to creat the wood cards?
Thanks for sharing your work, it’s so inspiring,
Hugs, Carmen
I absolutely love the Valentine cards you created, Julie! You mom must be so happy!! Do you have a video on how to creat the wood cards?
Thanks for sharing your work, it’s so inspiring,
Hugs, Carmen
I absolutely love the Valentine cards you created, Julie! You mom must be so happy!! Do you have a video on how to creat the wood cards?
Thanks for sharing your work, it’s so inspiring,
Hugs, Carmen
I absolutely love the Valentine cards you created, Julie! You mom must be so happy!! Do you have a video on how to creat the wood cards?
Thanks for sharing your work, it’s so inspiring,
Hugs, Carmen
I absolutely love the Valentine cards you created, Julie! You mom must be so happy!! Do you have a video on how to creat the wood cards?
Thanks for sharing your work, it’s so inspiring,
Hugs, Carmen
I absolutely love the Valentine cards you created, Julie! You mom must be so happy!! Do you have a video on how to creat the wood cards?
Thanks for sharing your work, it’s so inspiring,
Hugs, Carmen
The video I linked to in the blog post shows how to do the wood veneer.
The video I linked to in the blog post shows how to do the wood veneer.
The video I linked to in the blog post shows how to do the wood veneer.
The video I linked to in the blog post shows how to do the wood veneer.
The video I linked to in the blog post shows how to do the wood veneer.
The video I linked to in the blog post shows how to do the wood veneer.
Love hearing that! Thank you!
Love hearing that! Thank you!
Love hearing that! Thank you!
Love hearing that! Thank you!
Love hearing that! Thank you!
Love hearing that! Thank you!
The video I linked to in the blog post shows how to do the paper folding.
The video I linked to in the blog post shows how to do the paper folding.
The video I linked to in the blog post shows how to do the paper folding.
The video I linked to in the blog post shows how to do the paper folding.
The video I linked to in the blog post shows how to do the paper folding.
The video I linked to in the blog post shows how to do the paper folding.
The heat embossing in this post was done with a hand carved stamp, not with my ScanNCut. And yes, you need to use the embossing mat when you emboss anything with the ScanNCut.
The heat embossing in this post was done with a hand carved stamp, not with my ScanNCut. And yes, you need to use the embossing mat when you emboss anything with the ScanNCut.
The heat embossing in this post was done with a hand carved stamp, not with my ScanNCut. And yes, you need to use the embossing mat when you emboss anything with the ScanNCut.
The heat embossing in this post was done with a hand carved stamp, not with my ScanNCut. And yes, you need to use the embossing mat when you emboss anything with the ScanNCut.
The heat embossing in this post was done with a hand carved stamp, not with my ScanNCut. And yes, you need to use the embossing mat when you emboss anything with the ScanNCut.
The heat embossing in this post was done with a hand carved stamp, not with my ScanNCut. And yes, you need to use the embossing mat when you emboss anything with the ScanNCut.
Wonderful, Julie! Wish I were on your Valentine list!
Wonderful, Julie! Wish I were on your Valentine list!
Wonderful, Julie! Wish I were on your Valentine list!
Wonderful, Julie! Wish I were on your Valentine list!
Wonderful, Julie! Wish I were on your Valentine list!
Wonderful, Julie! Wish I were on your Valentine list!
Thank you Julie. I just now watched both videos. Love your stamp and exploding technique of your exploding card. I like the stamp that you created the fact that it is rubber and you used on the acrylic block I have some rubber stamps with the wooden block. I really like your stamps.
Your not only put a smile on my face with your designs but also with your sense of humor while you are creating. I did get a chuckle. Love the singing and the voices you do. Lots of fun.
I will try out the embossing with the snc. Thank you for replying back to me. I deeply appreciate it.
Happy Wednesday,
Fawna
Can you share more on what design you used for the pop up hearts and how you made the envelopes? Thank you!
Can you share more on what design you used for the pop up hearts and how you made the envelopes? Thank you!
Can you share more on what design you used for the pop up hearts and how you made the envelopes? Thank you!
Can you share more on what design you used for the pop up hearts and how you made the envelopes? Thank you!
Can you share more on what design you used for the pop up hearts and how you made the envelopes? Thank you!
Can you share more on what design you used for the pop up hearts and how you made the envelopes? Thank you!