
Hello everyone! It’s Jenn Shurkus here- from New England and Shurkus.com. I’m wicked excited to be here and thank you to Julie for allowing us to share on her blog!
I figured with it being a new year- and all about fresh starts I would teach you a great foundation technique for Art Journaling. I have had quite a few friends this past year asking me how to get started in Art Journaling, and feeling overwhelmed by all the techniques and supplies to be had- so I always share with them this easy yet affective technique. I learned about this technique in one of the first classes I ever took with Dina Wakley, I think back when she was doing her Art Journal classes online.
Let’s get artsy!
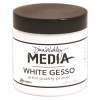
Step 1: Gesso your page, or spread in your art journal. I am working in the large Dylusions Art Journal from Ranger. I cheat by heat setting it to speed up the dry time.
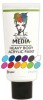
Step 2: Using a palette knife scrape on one color of paint. Here I used Dina Wakley’s Ruby Paint. Be sure to leave some “white space”
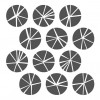
Step 3: While the paint is still pretty wet lay a stencil over your page ( I used Julie’s Shattered Circles), and rub through it with a baby wipe. If the baby wipe is really wet, be sure to wipe it off on your artsy apron or a paper towel to absorb some of the moisture. Work your way around your page. Also rub in the white areas, some of the paint will transfer from your baby wipe onto the white gesso’d areas.
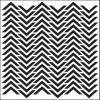
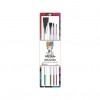
Step 4: You can now begin to build up more layers on your page. Here I used Julie’s Chevron Stencil and Dina Wakley Night paint (my fave!). I also use a stiff bristled brush to do this step so that the paint won’t seep under the stencil.
Now you have a base on your page to begin with. It’s sometimes hard staring at a blank page to get started and get those creative juices flowing!
I also put together a quick tutorial video for you with a BONUS technique of using your stencils like stamps! Watch the video below:
SUPPLIES USED:
          |
- Instagram: http://www.instagram.com/jennshurkus
- Facebook: http://www.facebook.com/jennshurkus.artist
- You Tube: http://www.youtube.com/jennshurkus
Thanks Jenn. I have a new art journal for the new year and I’m inspired to go off and start a page right now! I guess that I need to buy a stiff bristled brush since I usually get the paint under the stencil and would like a clearer image.
Thanks Jenn. I have a new art journal for the new year and I’m inspired to go off and start a page right now! I guess that I need to buy a stiff bristled brush since I usually get the paint under the stencil and would like a clearer image.
Thanks Jenn. I have a new art journal for the new year and I’m inspired to go off and start a page right now! I guess that I need to buy a stiff bristled brush since I usually get the paint under the stencil and would like a clearer image.
Thanks Jenn. I have a new art journal for the new year and I’m inspired to go off and start a page right now! I guess that I need to buy a stiff bristled brush since I usually get the paint under the stencil and would like a clearer image.
Thanks Jenn. I have a new art journal for the new year and I’m inspired to go off and start a page right now! I guess that I need to buy a stiff bristled brush since I usually get the paint under the stencil and would like a clearer image.
The blank page can indeed be daunting. Great techniques to get the ball rolling!
The blank page can indeed be daunting. Great techniques to get the ball rolling!
The blank page can indeed be daunting. Great techniques to get the ball rolling!
The blank page can indeed be daunting. Great techniques to get the ball rolling!
The blank page can indeed be daunting. Great techniques to get the ball rolling!
Jenn,
Thanks for the video and the refresher on using the stencil to remove color. I also learned that from Dina a while ago, but I forget stuff because I keep learning more. Good problem!
Jenn,
Thanks for the video and the refresher on using the stencil to remove color. I also learned that from Dina a while ago, but I forget stuff because I keep learning more. Good problem!
Jenn,
Thanks for the video and the refresher on using the stencil to remove color. I also learned that from Dina a while ago, but I forget stuff because I keep learning more. Good problem!
Jenn,
Thanks for the video and the refresher on using the stencil to remove color. I also learned that from Dina a while ago, but I forget stuff because I keep learning more. Good problem!
Jenn,
Thanks for the video and the refresher on using the stencil to remove color. I also learned that from Dina a while ago, but I forget stuff because I keep learning more. Good problem!
Cool technique…
Cool technique…
Cool technique…
Cool technique…
Cool technique…
Yeah… that’s pretty much the coolest thing ever.
Yeah… that’s pretty much the coolest thing ever.
Yeah… that’s pretty much the coolest thing ever.
Yeah… that’s pretty much the coolest thing ever.
Yeah… that’s pretty much the coolest thing ever.
Yes Sue, it really does make a difference to have a brush with not a lot of give. Also only dab into the paint a little bit, you can always go back and add more if the color isn’t bold enough. I really like Dina Wakley’s brush set and they are affordable too! 🙂 have a great day!
Yes Sue, it really does make a difference to have a brush with not a lot of give. Also only dab into the paint a little bit, you can always go back and add more if the color isn’t bold enough. I really like Dina Wakley’s brush set and they are affordable too! 🙂 have a great day!
Yes Sue, it really does make a difference to have a brush with not a lot of give. Also only dab into the paint a little bit, you can always go back and add more if the color isn’t bold enough. I really like Dina Wakley’s brush set and they are affordable too! 🙂 have a great day!
Yes Sue, it really does make a difference to have a brush with not a lot of give. Also only dab into the paint a little bit, you can always go back and add more if the color isn’t bold enough. I really like Dina Wakley’s brush set and they are affordable too! 🙂 have a great day!
Yes Sue, it really does make a difference to have a brush with not a lot of give. Also only dab into the paint a little bit, you can always go back and add more if the color isn’t bold enough. I really like Dina Wakley’s brush set and they are affordable too! 🙂 have a great day!
that is a good problem 😉 thank you so much joy!
that is a good problem 😉 thank you so much joy!
that is a good problem 😉 thank you so much joy!
that is a good problem 😉 thank you so much joy!
that is a good problem 😉 thank you so much joy!
thank you Boo! Hope you get to try it out 🙂
thank you Boo! Hope you get to try it out 🙂
thank you Boo! Hope you get to try it out 🙂
thank you Boo! Hope you get to try it out 🙂
thank you Boo! Hope you get to try it out 🙂
and you miss becca are pretty awesome too! 🙂
and you miss becca are pretty awesome too! 🙂
and you miss becca are pretty awesome too! 🙂
and you miss becca are pretty awesome too! 🙂
and you miss becca are pretty awesome too! 🙂
Hi Jenn, I am new multi media, so just getting into playing with gesso and different mediums. I saw your post on FB re: your video and had to come view. I really learned a lot watching your video. I love stencils but I don’t use them very often in my projects. I never thought about using stencils as a stamp. Cool idea. 😀 Heading over to your blog to subscribe. 😀 Thank you for the awesome video on how to get started.
Deborah xxx
will be trying this as I have all of the materials needed…yay!
will be trying this as I have all of the materials needed…yay!
will be trying this as I have all of the materials needed…yay!
will be trying this as I have all of the materials needed…yay!
will be trying this as I have all of the materials needed…yay!
I’m doing the cover of a sketchbook today that I have already gessoed. Bam! Now I can try your new technique 🙂
I’m doing the cover of a sketchbook today that I have already gessoed. Bam! Now I can try your new technique 🙂
I’m doing the cover of a sketchbook today that I have already gessoed. Bam! Now I can try your new technique 🙂
I’m doing the cover of a sketchbook today that I have already gessoed. Bam! Now I can try your new technique 🙂
I’m doing the cover of a sketchbook today that I have already gessoed. Bam! Now I can try your new technique 🙂
Great tutorial Jenn! I love this technique and am inspired to go make some foundations in my journal 🙂
Great tutorial Jenn! I love this technique and am inspired to go make some foundations in my journal 🙂
Great tutorial Jenn! I love this technique and am inspired to go make some foundations in my journal 🙂
Great tutorial Jenn! I love this technique and am inspired to go make some foundations in my journal 🙂
Great tutorial Jenn! I love this technique and am inspired to go make some foundations in my journal 🙂
FABULOUS tutorial, loved it and learned so much …. going to get shattered circles asap! Really really enjoyed this … thanks!!
FABULOUS tutorial, loved it and learned so much …. going to get shattered circles asap! Really really enjoyed this … thanks!!
FABULOUS tutorial, loved it and learned so much …. going to get shattered circles asap! Really really enjoyed this … thanks!!
FABULOUS tutorial, loved it and learned so much …. going to get shattered circles asap! Really really enjoyed this … thanks!!
FABULOUS tutorial, loved it and learned so much …. going to get shattered circles asap! Really really enjoyed this … thanks!!
Great technique! thanks for sharing.
Great technique! thanks for sharing.
Great technique! thanks for sharing.
Great technique! thanks for sharing.
Great technique! thanks for sharing.
Great tutorial jenn! Very inspiring!
Great tutorial jenn! Very inspiring!
Great tutorial jenn! Very inspiring!
Great tutorial jenn! Very inspiring!
Great tutorial jenn! Very inspiring!