
You guys, I’m feeling so inspired by these DIY lace doilies from paper! I think you’ll love them too!
The Story Behind the Lace Doilies
Lately I’ve been starting each day with half-an-hour of “creative computer time.” That’s a fancy way of saying, I cruise Pinterest. On Tuesday I was on such a cruise and I found a tutorial so awesome that it made me stop, cut my “creative computer time” right there, and head to the work table!
Essentially it’s a way to make your own doilies with a bit of creative folding and some paper punches. The tutorial is in French, but the pictures make it easy to understand. The author’s first name is Nathalie, but I couldn’t find her last name.
I didn’t have any tissue paper in my stash, but I did have my most trusty Deli Paper! I made a whole stash of DIY lace doilies and then put a few of them together to create this scrapbook page:

Here are some of the details:
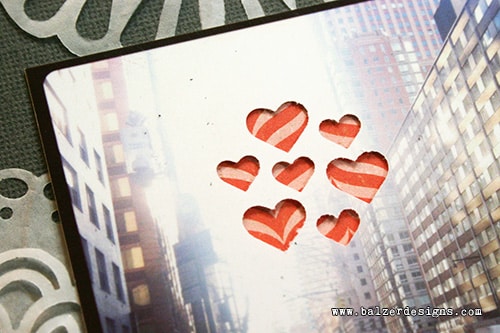
I used a heart punch to cut out the hearts and then taped a piece of red patterned paper behind the photo. I really like the depth it creates. It shouldn’t be that different from gluing hearts on top, but somehow it is. Maybe it’s the shadow?

The title was created with an alphabet stamp set I carved and white embossing powder. (You can learn to carve your own stamps in my Stamp Carving 101 Class.)

And here you can see that I layered some of the hand made lace doilies.
Can’t Stop. Won’t Stop.
Making these lace doilies is soooooo addictive. I see a lot of them in my future. They were super easy to make with such great results! I even made some fancy ones with multiple punches, folds, and some hand cutting. Check them out:

Can’t you see using these for Valentine’s Day Cards, a Winter window display, and maybe even Christmas ornaments? (I have a number of FREE blog post tutorials about making your own Christmas ornaments, you can check them out HERE.)
I hope you feel as inspired as I did and make some paper lace doilies of your own!
Thanks for stopping by!
Thanks for posting your find. What a great idea and a great way to use all those punches one has collected. I only wish I didn’t have to go off to work so I could go play today.
I used to love doing this in school when I was a kid. We would all try to find intricate ways to make them out of whatever paper we could find (I think we were bored by paper dolls, but these? These were cool!) I haven’t actually done any since my children were little. Maybe we’ll play with that again this year (we always did it in the winter, it was Christmas Snowflakes that we made. Oh, and you should try coffee filters with them too!)
Nice! Will have to check out the post on pinterest for the details. I like your idea of limiting computer time to 1/2 an hour – i get on line in the morning and the time just melts away and before I know it I’m running late. I liked Kyra’s idea (comment above) of using coffee filters, too. Have a great day.
Oh, so great! thanks for posting this. I went to the site; it’s full of lovely things and ideas and of bright colours.
WOW!!! I have been avoiding Pintrest but might change my mind! Great tutorial and I Love that layout!
Wow! All I can say is WOW! Thanks for sharing
Very very cool! I like your page sentiment too. I just got back from a trip up north by train where I spent too few days in NYC. sigh. It’s still the best city, ever. Even more so than when I lived there.
Thanks for the inspiration about the computer timer app too!
Thank you so much! I loved the page you did and I went to Natalie’s blog and signed up for her emails too. I will definitely put this on my must-do list!
Fun post. I especially like how the red paper shows through the hearts on your LO.
I can see that coffee filters would make great paper to use for this project as well. It is already round, cheap, and I have it on hand right now! Thanks for sharing this great find.
Julie, this is genius! Thank you for passing this on to us. Oh, wow!
These are awesome! Who THINKS of these things? Well, I’m glad you posted this. Lots of possibilities 🙂
oooh what pretties!! Love how you punched hearts and placed patterned paper behind the photo on your layout!
“Love!”
Those are amazing. I’m so glad you shared this.
Thank you for sharing the doily tut & the timer info. The doilies will be a lovely addition to my creations.
I love the timer idea so much. I have now set mine for 1 hour to do all my web work. It’s the news that eats up my time so maybe I can now get more creating in.
~C8>
Can you explain pinterest to me? I am not sure how it differs from just searching for a subject using google.
I understand most of the tutorial, but can’t wrap my head around how you did your fancy ones. Maybe on a future post you can show the punches you used. I think that might help. Love the layout you did with them.
This is a fabulous idea!!! Thanks for sharing!
What an awesome tutorial. Thanks for sharing. And I love what you did with the heart punches on the photo!
What a great tip. Thanks for that. There’ve even been times when I’ve needed a paper doiley in the kitchen and not had one…problem now solved thanks to you.
Cool. Thanks for sharing this. Also love your idea for controlling computer time.
When you click on the link for the tutorial, there’s an option to translate to English at the top of the page. 🙂
Awesome – both the tutorial and your layout. Loving those punched hearts!
Hey Julie et all,
I have been doing this with the dies for the sizzix every year for winter. Just load the paper so that it does not get cut all the way through on the sides and some cool unexpected designs will result.
Look what you’ve started with us, Julie! Soon you will be featuring the Daily Doily – LOL. Wow, you really went to town on examples, thanks for showing them to us. And you’ve really piqued my curiosity with deli paper!
If you right click on the page there is an option to translate with bing on my windows laptop. you select that option and it opens a translated page. these look so cool!!
I just jumped up and went and made my first one. Not a great success, but huge potential, I’m going to try again. Just wanted to come back here first to say thanks for the idea! Your doilies were very inspiring too and I love how you punched the Martha heart confetti punch straight into your photo and backed it with paper. Scrap on!
Debra
Robin, Pintrest is like a virtual pinboard of ideas. The benefit is that you can pin all the things you like onto your own pinboard and be inspired by what you like every time you visit. You can have multiple boards too – crafting, home, cooking – whatever you like. Give it a whirl, it’s great fun. Remember it’s about pinning all the great ideas you find into one place so you can find them again.
Hi Julie! Great post!.. I really hate when I run out of doilies, or when I don’t have just the right size I need for one project or another, so this is a really great idea! Thanks to both you and Nathalie for sharing it!
Thank you for sharing! I got right up, grabbed some tissue paper that was on my table from who knows where, and started punching. What fun, and so easy!
ooh-la-la- – very ‘noice’ … love the idea.
Thank you once again for all of your adventuring into “how do I use this stuff?” All of your tutorials are just wonderful and so complete! I really appreciate your generosity with the videos and all the photos. It makes learning so much easier and fun, too!
What a wonderful tutorial. Thanks so much for sharing this.
Just beautiful— the doilies and layout 🙂
Pingback: How to Cut Painted Paper with the ScanNCut - Balzer Designs Blog